A few homeschool families that we know wanted to learn how to make cold-process soap (using lye and fats). Monday was the day! Lots of good kids and very nice adults. I wanted to 'blog' the class so that the people who were here could use it for a reference. I had a few great photographers who took pictures for us all to enjoy.
* * * * * *
Warning: This is how I make soap. Soapmaking can be dangerous because of the caustic nature of lye. I hope I scared the kids enough that they will not do this without adult supervision. I am not responsible for any injuries, losses, or other damage that may result from your use or misuse of the information I've provided.
* * * * * *
Here is the recipe we used:

You need a good recipe or a lye calculator to make sure you get the proportions right between the lye and the fats. Each fat has a different saponification value. If you want to experiment with different fats, you need to use a lye calculator to input the amounts and types of fats you will be using. The lye calculator tells you how much lye and water (or other liquid) you will need.
The lye calculator I used can be found at
Benjamin Farms. Here is a link to their
Soapmaking 101 page. Simple step by step directions that I used when I taught this group. Another lye calculator can be found at
Pine Meadows. I buy my supplies from Pine Meadows because they are so helpful and their prices are reasonable.
Gather all your equipment first.
- safety equipment (rubber gloves, apron, goggles)
- wooden spoons dedicated to soapmaking
- stainless steel pots to melt the fats in (never use aluminum or cast iron for making soap)
- a thermometer
- a scale that is accurate to 0.1 ounces (many kitchen scales are)
- a stick blender (or an old blender container for your counter blender)
- containers to measure the water, lye, and fat in (you must use a completely dry container to measure the lye in)
- a glass (or other non-reactive bowl) for mixing the lye and the fat together
- soap mold (a utensil organizer from Wal*Mart works very well for a single pound of soap)
- a spray bottle with vinegar (to neutralize the lye if you spill some)
- an old towel (for keeping the soap warm after it is mixed)
- an old cooling rack or something to sit the soap on while it cures for a few weeks
The general rule is to have dedicated soapmaking equipment. In other words, don't use the equipment for anything other than making soap.
Now for the fun part!
 Usually I mix the lye and the liquid first so that it can cool while I am melting the fats. There were enough people here that I didn't want to leave the lye too long and let some of it escape into the atmosphere. I also didn't want to leave the lye unattended outside. It is very dangerous stuff! So... we melted the fats first.
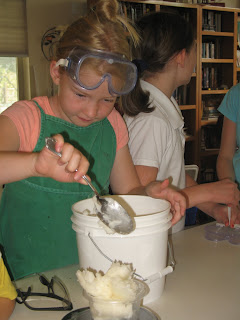
Beeswax has the highest melting point, so that went in the pot first. In the picture above you see one of the children measuring the Coconut Oil.
 Here is another helper measuring the Palm Oil.
Often the lye will be too warm to add to the fat (or the fat will be too warm to add to the lye). The kids were surprised at how hot the container was that held the lye/water mixture. They knew I had not used hot water from the sink!
The lye mixture was still too hot at 180˚F. I put the plastic container that had the hot lye/water mixture into a bowl that had ice and water. This cooled the lye/water mixture fairly quickly to about 110˚F. The idea is that the melted fats and the lye/water mixture are close to the same temperature--about 100˚F. The fat had already cooled down to about 115˚F.
 Here are the melted fats and the lye/water mixture ready to mix together.
 This is what the melted fats look like before I added the lye/water mixture.
 I used a glass jar to hold the fats and then I poured the lye/water mixture into that jar. It is recommended that you add the lye mixture to the fats. I don't know if it really matters, I've done it both ways. I used a glass jar so the kids could see what was happening. You can use any type of non-reactive bowl. Usually something with straight sides will be safer than something with sloping sides. I liked the jar because it comes in at the top. If the mixture splashed at all (it didn't) then the chances of it splashing out of this container was less than out of a bowl.
 The last soapmaking class I went to had us use a stick blender. When I first learned to make soap we used a regular stand mixer and it took anywhere from 30 minutes to an hour for the soap to 'trace'. The stick blender works in about 5 minutes! (However, when making goat's milk soap I have to use a regular blender because it does take longer to get to 'trace' and the stick blender was getting too hot.)
 Here the mixture is tracing. I added the fragrance at this point. It is best to add the fragrance after the lye has started to combine with the fats. If you want to add a colorant, you can add it with the fragrance.
Here is a good video of when soap
traces.
 I think they are enjoying the chemistry/soapmaking lesson. And they are all wearing their goggles!
 Okay! The mixture is ready for the mold!
 My friend is an excellent photographer! I had no idea she was behind me taking photos! This is a great view of pouring the soap into the mold. You can see that the mold is really one of those drawer organizers. They hold a one pound batch of soap.
 Another photo of putting the soap into the mold. I am still wearing gloves because the soap has not completely saponified yet, the lye and the fats have not finished combining so the mixture is still caustic.
 After the soap is in the mold I tap it on the counter to remove as many bubbles as possible.
 The next step is to cover the soap with a piece of plastic wrap and cover it with a few layers of towels to keep it warm until it is hard. The plastic wrap is right on top of the soap. It makes it easier to smooth the top of the soap and it helps keep the heat in and the air out until the soap is hard and completely saponified.
 After the soap firms up (about 10 hours later) I turned the mold upside down and tapped it on the counter. If the soap hadn't come out easily, I would have put the mold with the soap into the freezer for 15-30 minutes. That helps shrink the soap and then it comes right out of the mold.
Vet2Be told me I should have taken a photo of the soap as it came out of the mold. He's right. Sorry I forgot! After the soap came out of the mold I cut it with a sharp knife. At this point the soap is firm, but still cuts easily. You can cut the bars into whatever size you want. I cut the soap into smaller bars so that I can give each family a few to finish curing at their house.
The soap is ready to use now but if you let it cure longer (let the water evaporate out of the bars) then the soap will last longer when you are using it. I've had different instructors and books give different time estimates for curing--anywhere from 2 weeks to 4 weeks.
You can let it cure in the linen closet and it will make your linen closet smell wonderful when you open the door! You can cure the soap any place that is in a fairly dry area and out of the sun.
If you want to learn about the history of soapmaking you can look
here (an easy to understand explanation) or
here (from Wikipedia--a more 'chemical' explanation).
 Newborn kid in a Kiddie Goat Sweater


