Friday, April 24, 2020

New Lamb and a New Calf

My friend needed to find a home for a little lamb. She raises sheep and sometimes there are lambs that don't do well on her small farm. She is 7 weeks old and the other lambs bully her, and don't let her eat.

She is gentle and sweet and likes people.
She'll be perfect for the visitors that come to the farm.

She's so cute and little! Almost like a cute stuffed animal!

The little lamb doesn't have a name yet. I've got a contest going at facebook to see what names my friends can come up with. If you have a good idea put it in the comments below!


I haven't picked up this 2 week old bull calf yet.
This is his photo from KSL Classifieds.
He should fit in nicely with the rest of the animals. His owner said he's very friendly

I'll be picking him up tomorrow and letting you know more about him next week. I love spring when we have babies on the farm!

He should fit in well with the other animals. The owners said he is friendly and loves to drink a bottle. He plays with the goats on their farm, too.

SideKick, the sheep, decided that Sadie is his new best friend.
He follows Sadie into the stall every night. He likes spending time with Sadie
better than he likes spending time with Teancum, the buck.

The animals are all happy it's spring, too. The pasture is growing and that is so much tastier than dry hay.


The kid goats are still here. They will be going to their new home in a few weeks. A barn burned down, and the new family is helping care for the animals that were injured.

One thing I really appreciate about most hobby farmers and small livestock owners is that we help each other out whenever we can. It's like a big family. We take care of our own, but we are always willing to help when an emergency comes up.

The garden is coming along slowly.
The girl across the street is helping fill the beds with dirt.
I teach her guitar, and she works off her lessons.

We are using some car ramps for the wheelbarrow to run up.
We can dump the dirt right into the bed without damaging the sides of the raised beds.
Some of the seeds are sprouting.
They are a little slow this year because I have them out in the mud room
instead of the basement where it's warmer.


I bought a few tomato plants, too.
I usually buy bigger tomato plants, but this year I decided to see if the
smaller plants would adjust better after planting in the garden.

I'll be using old 5 gallon buckets as protection for the tomatoes this year. My friend likes them so much better than using the water filled garden tee pees that most people like to use. I don't like the water tee pees much because they are hard to keep filled, and if we have a wind storm they blow over on the plant.

*     *     *     *     *

Warning: dog injury photos below!


Mishka, the puppy who just turned 1 year old this month, likes to play.

She likes to play even when the other dogs are done playing.

She can get a little annoying, just like a little sister picks on a big sister or brother.

Then someone gets hurt.

We thought we had treated her wound, but we missed some of it. When we found the infection we had to trim all the fur away, drain the infection, and clean it with saline solution (the stuff people use for the contacts).

This is what it looked like right after we finished. 


Bryon and Heather have been working on a skin cream with CBD for pain for about 2 years. They are scientists so they had access to it before most people did.

We have found that it does a great job healing! They even have a patent pending on it. 

This is what it looked like 12 hours later.


And this is what it looks like 5 days later.
It looks a little gooby because we just put more cream on it.
She's healing really well, and the infection hasn't returned. If you're interested in supporting our small business, here is the link to The Doctors web page.

Why is it called The Doctors? Because both Bryon and Heather have PhD's. Bryon has a PhD in Organic Chemistry, and Heather has a PhD in Biochemistry.

They make a great team!

They are two people that really 'think they can' and they are right! They know it can be hard work, but they also know they can do whatever they put their mind to!


Friday, April 17, 2020

New Raised Beds and Trouble-making Goat Kids


It's spring and we're getting ready to plant the garden.

On the 'to do' list this year is a greenhouse in the garden area so we've had to move the garden for the summer.

New raised beds are a great option for the area we've chosen. We're putting up the raised beds in the 'buck pen.' We keep animals in here when we're breeding, and for the winter. It's close to the barn and we can keep an eye on the animals in the winter.

This is probably something your kids can help you do. I'm sure that if my grandsons were here this would have taken longer, but they would have been able to help hold the boards and use the screw gun.

I've had one garden box for about 8 years and it's doing great. No problems at all. These boxes are about $20 each to make.

The 8 year old box is in the back row on the left.
You'll need 5 cedar pickets and a 2" x 2" pine board. You may want a longer 2"x2" board if you're making more than one box. You'll also need some deck screws.

We bought enough wood for 8 boxes because they are fast to make.

Cut 2 of the boards in half. Cut four pieces of the 2"x2" pine board 11" long. It's ok if they are longer. Our first box has corner pieces that are longer.

We used the cedar pickets without trimming the 'dog ear' tops. Even with the dog ears, they covered the corner posts well enough that we didn't need to trim them off. Faster isn't always better, but in this case faster is better.

Deck Screws last longer when used outside.

Set the cedar picket onto the post, making sure the bottom of the post and the picket are even.


Secure with 2 screws.

Put one 2"x2" on the end of two different boards. These are the bottom of your long sides.


Have someone hold the board up while you screw in one of the pickets that was cut in half.
Screw one on each end.


We add one more row of pickets around the box because it's hot in Utah and a little more dirt helps the garden stay moist. You might not need a box that is two pickets high.
The 'dog ear' cuts on the top of the pickets are short so when they are attached to the 2"x2" no dirt leaks out.


Helpers....


There are always four-legged helpers.


I saved brown paper feedbags as liners for my garden.
You might want to save cardboard, or newspapers.
Those all work as weed barriers so we don't get grass or
weeds growing up through the good dirt we're adding to the garden boxes.


I had to cut off the ends of the paper bags. It doesn't take too long. That is a job that most kids who can use scissors can to. Kids are also great at opening up cardboard boxes.

Four-legged helpers....
The bags still smell a little bit like grain so Echo wanted a taste.


Line the bed with whatever weed barrier works best, or is easiest to get.


Then fill with dirt.
Our beds take about 2 wheelbarrows full of dirt.
My wheelbarrow hold a lot of dirt!


Our beds will be fairly close together, just enough room to get between beds and take care of them. I have to fill one bed at a time because I need to move one out of the way to get the wheelbarrow close enough to shovel the dirt into the bed.

I have some pots to hold tomatoes, too.
See the big tarp?
That will come off this weekend. It's the shelter for the animals that
stay in the pen during the winter.
It will be a great place for cucumbers and peas and beans
to grow during the summer.


I planted some seeds this week, too!
I use the handle of a plastic fork to twist open the top of the seed pot a little.
It makes it much easier to get a seed inside.


I use a permanent metallic marker to label the rows.
It's the easiest way for me to keep track of what seeds I planted in each row.
I've tried sticks with labels, but they usually fall out or get knocked out.
This is what I've been doing for the last few years, and it seems to be the best for me. 

Have you planted seeds this year? My grandkids usually help me plant the seeds, and help me pick what seeds to buy. This year is a little different while we are all trying to keep our germs to ourselves.

I also label the seed packages.
Row 2 seeds are squash, row 3 are watermelon (yay!) and row 4 are pumpkins.


It's not quite time to plant potatoes.
Last year I planted them in reusable shopping bags.
I got my idea here, but used some extra bags that I had on hand.
The crop was wonderful!
I'll be repurposing a few again this year.
I might also try growing potatoes in stacked tires.
We try new things in the garden every year. Just to experiment and see how things work.


We have the hoses and sprinklers all hooked up and ready to water the pasture.
We had to let the sprinklers run overnight when it froze again!
It looked so pretty on the fence!


Tia and Mia are growing well!
They are so friendly because they are still being bottle fed.
They love to follow me around on the farm.


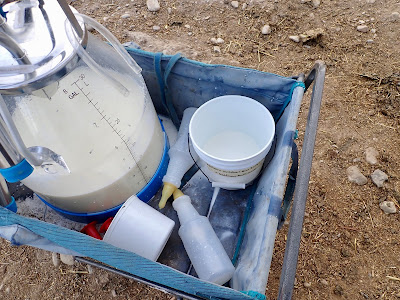
One morning I forgot to hold the little bucket of goat milk.
Mia and Tia jumped into the wagon and their whole bucket of
milk was tipped over!
They were a little hungry that day because that's the milk I use in their bottles.


They love to get into other mischief, too!

Cute little trouble-makers!

I'm really glad I get to spend time outside this spring. The weather has been warm, then cold, then freezing, then warm again. But I love the sunshine and getting back to work on the farm.


Friday, April 10, 2020

Fitted Masks with Interfacing and Pocket

It's Spring Break in our area so I think it's ok to put do another post about masks.

As a reminder, you won't find ads on this blog. It isn't monetized. I don't receive any compensation for any of my posts.

Here is some information from the CDC about cloth face coverings.

This is how I make the masks from the Craft Passion website.

I turn the edges under instead of doing it the way its shown in the original instructions. Tucking in the ends to form a hem, rather than folding over the ends to make a casing, makes the mask slightly wide, and uses less elastic. Elastic is in short supply right now.

If you're interested in my previous post, it has lots of information that I won't repeat here. I suggest you watch the videos at the end of that post, too.

I really make my masks this way. Although for children I don't put the pocket for an extra filter inside. The children are just getting used to wearing a mask and they aren't the ones most at risk.


I also add a small pleat on each side so the mask fits better.
Supplies

Regular sewing supplies including sewing machine, thread, scissors, pins.

100% pre-washed cotton fabric that is as tightly woven as possible. 100% cotton holds up under repeated washings in high temperature.

Medium weight interfacing for lining. I have 20" rolls for my embroidery business. This size from World Weidner might be better for home sewers. I also use this Metro brand stabilizer. It's a little softer than the World Weidner.

1/4" braided elastic if you can find it. You can also use tee-shirt yarn. If you can find hair elastics, those work, too if you can get the 2mm kind. I've used this kind with good results if you put a knot in the end to hold it in the seam. You'll need 2 pieces of 5 1/2" - 6 1/2" elastic. I wish there was a 'one size fits all' mask and elastic, but there isn't. You may have to make one or two masks to get a size that's appropriate for your face.

Wire for the nose piece. Some people are using a long pipe cleaner twisted double so that it's 2 pipe cleaners thick. It's soft and comfortable, but we don't know how long it will hold up in the wash. I'm using 18 gauge copper wire that I purchased at Lowe's.
I cut my pieces 5 1/2" long and turn the ends under so they don't poke through the fabric.
Plastic beading foot, or cording foot to sew the wire into a casing.
You can use a zipper foot if that's easier for you.


Cutting
Cut 4 of the Main Fabric pattern piece (or 2 main fabric and 2 coordinating fabric if you don't have enough of your main fabric)

Cut 2 interfacing (or stabilizer) using the Lining Fabric pattern piece.

Cut 2 of another fabric for the pocket. Notice that piece is about 3/4" shorter from left to right so that the pocket is easily accessible if an added filter is wanted.


I use a sheet for the filter pocket.
Notice that the filter pocket is shorter than the interfacing piece. 

Place the pocket pieces together.
 Sewing the Mask
I sew all my seams about 1/4"

Serge or sew the center front seam
and the two edges.

If you don't have a serger to finish the two edges, turn the edges under twice to cover the raw edges.

Turn the edges under to make a hem. Top-stitch in place. 


Place a piece of interfacing, two pieces of main fabric right sides together,
and the second piece of interfacing together. 

Place the other two pieces of main fabric, right sides together


Sew the front center seams together on both the stack of 4 (with interfacing)
and the 2 pieces.

Sewing is fine, you don't need a serger.
I use a serger because it's faster.

Open the filter pocket, and the piece without the interfacing.
Place them right-sides up
(the wrong side of the pocket will be touching the right side of the main fabric)

Place the piece with the interfacing right sides together with the filter pocket and pin in place.

From cutting table to ceiling
piece with no interfacing (black fabric)
lining pocket (light colored shorter piece)
outer mask (black fabric) with the interfacing attached at center seam.

Sew along the top edge.

Flip right side out, hammer the top center seam if it is thick.
It will be much easier to sew the wire in place if that part is flattened a little.
(Thanks Dad! This is my favorite sewing room hammer!)

Add a piece of wire under the nose seam.

Pin in place from the outside.
Mark the ends of the wire so you don't accidentally sew over them.

Topstitch around the wire.


Flip right sides together and pin in place.

Stitch 1/4" from the bottom edge.

Flip the tube right side out,
press the bottom seam.

Turn the side edges under,
slip elastic into the top edge and about 3/4" away from the bottom edge.
I use Elmer's washable school glue instead of pins.
Seal the edges with an iron if you use glue.
I use a corn holder to make the pleats on the side. If you don't have a corn holder, pinch about 1/2" of fabric along the side seams. I make sure my pleats are folding down on the outside of the mask.


Sew down one side, along the bottom, and up the other side.
Double stitch over the elastics.
Add pleats with a corn holder (or your fingers)
so the mask fits a little closer to the sides of your face.


Done!

You may have to fiddle with the elastic length. I use 6" on either side for adult sizes. You may need elastic that is slightly longer, or slightly shorter depending on the size of the face you're trying to fit.

Wash before use!

These are the instructions I send out with masks.
Use your best judgement when making, wearing, and washing your masks.

The two masks on the left used exactly the same pattern pieces.
The bottom one was sewn using these instructions,
the top was sewn using the instructions in this post.
You will have a smaller mask using the Craft Passion instructions.
The blue mask was made using the size listed for men.
The floral was made using the pattern pieces for women.


One more video with some good information


Although she said the 'duck bill' style didn't pass the test, other testers have found that the 'duck bill' style does pass the test if elastic is used.

The other person who did the testing is developing the duck bill style mask for home sewers who are making masks for use in the healthcare industry. You may or may not need as much protection as health care workers do. Please use your best judgement.


Tiana's Closet has an interesting mask pattern that looks easy to sew, and has a pocket.