I made feta about two weeks ago. I took the photos but haven't had time to sit down and write about it for my good friend, Sheepy.
I use the recipe in
Home Cheesemaking by Ricki Carroll as my basic recipe, but I changed the starter from a mesophilic starter to yogurt. The reason I use yogurt is because it works as well as the plain mesophilic starter and has a little different flavor. I read about using yogurt in an old
Solait Cheesemaking booklet.
Feta takes me about 7 hours to make. Most of that time I am not doing anything with the milk or curd itself, it is sitting and waiting for the next step as I follow the recipe. I start this cheese in the mid-morning and it is ready to put in the fridge by dinner or after we are done milking.
Feta
Step 1 (From Home Cheesemaking--with modifications)
Heating the milk and adding the starter
I usually make a two gallon batch since I have so much milk. In the photo below I've heated two gallons of milk to 86˚F.
 |
| Two gallons of fresh goat's milk. I didn't pasteurize it this time. After making clabbered milk I realized that raw milk isn't as scary as I once thought. |
 |
| 86˚F, just the right temperature to add the starter. |
I added 8 ounces of home made yogurt instead of the mesophilic starter. I think next time I will try it with 4 ounces, just to see what happens. I've had good results adding half the starter to my yogurt and chevre recipes, too.
Then the milk is covered and left at room temperature for an hour to ripen. I put it on the back of my stove in a draft free spot. In the winter I put it into my wonderbox, but in the summer I leave it on the stove.
 |
| Ripening for an hour on the back of the stove. Sometimes it ripens for a little longer if I am off doing something else. |
Step 2
Adding the rennet.
 |
| 1 teaspoon of liquid rennet added to 1/3 cup of unchlorinated water. |
 |
| Stirring in the rennet with an up and down motion using my skimmer spoon. I'm ordering a slotted spoon from New England Cheesemaking Supply this month, but this has worked well for most of my cheeses. |
The recipe says to stir the curd for 'several minutes'. It starts to form a curd within about 80 seconds the last three times I've used the recipe. It doesn't seem to affect the final product, but it is still curious for me. The next time I try making feta I'm going to try stirring for one minute instead of the two I normally do.
 |
| Odd looking stuff! I don't seem to get a creamy, solid curd in the whey lately. This is what it looks like as the curd is setting for another hour. I've been wondering if my milk gets too acidic while the starter is ripening. |
Step 3
Cutting the Curds
 |
| Cutting the curds with my large spatula/knife. It doesn't have a sharp edge, it is just a long, thin blade. Sometimes the curd swims around the pot while I am trying to cut it. If that happens, I put my clean hand in and gently hold the curd while I am cutting with the other hand. |
You can see, I don't get a nice curd! That's okay with me right now, it still tastes good in the end!
After cutting the curd, I let it rest for 10 minutes. Apparently cutting the curd is hard work for the cheese.
Step 4
Stirring the curd
 |
| Gently stirring for 20 minutes. The book doesn't mention keeping it at the same temperature. I turn the heat on very low, the lowest setting possible, and stir for 20 minutes. I check the thermometer often and try to keep it right around 86˚F |
(look
here for updated recipe changes)
Step 5
Draining the curd
 |
| Pour the curds and whey from the pot into a wire mesh strainer lined with butter muslin. My mesh strainer fits exactly into the top of my spaghetti pot, that I only use for cheesemaking! |
 |
| Corners all tied up and the curds draining on the cider press next to my computer. See the whey coming from the bottom in a steady stream? Yum! This smells really good! It will hang here for about 4 hours. |
 |
| What the leftover whey looks like. I use it to make bread or pour on the garden. My neighbor likes to use it for her bread, too. Nice to know it goes to good use and I don't have to dump it down the drain. |
Step 6
Crumbling the curds
 |
| Right after I open the bag! |
 |
| Ahhh... the beauty of a nicely drained curd! It is so smooth and creamy looking, I love it! This is one of the reasons I fell in love with cheesemaking, the curd as it comes out of the bag. |
 |
| Instead of cutting the curd into 1" cubes, I crumbled this batch. We love it crumbled on salads. Vet2Be and I love to eat the cubed version for a snack. We make it both ways depending on what we don't have in the fridge. |
I've sprinkled on 2 tablespoons of non-iodized salt. The recipe says to use 2-4 tablespoons per gallon of milk, but that is too salty for us. I always start out with less salt and add more to taste.
Step 6a
Quick aging the cheese
Since I have a FoodSaver with a marinating container, I thought I would see if I could quick age the cheese this time. I put the curds into the container and hooked it up to the FoodSaver. If I was being scientific (in other words, I should have.....) I would have put half of the salted curds in a covered bowl in the refrigerator and half the curds into the marinating container. We're still milking, so I'm sure I'll give that a try the next time!
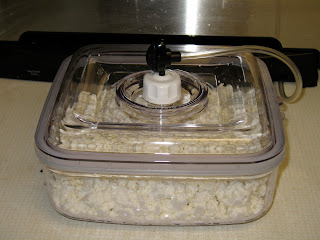
The crumbled, salted curds in the marinating container. All I have to do is push the 'Marinate' button and the machine cycles through suction and no suction for about 10 minutes. I pushed the button twice for a total of 20 minutes. |
 |
| All ready to go into the fridge. Masking tape makes a great label in my fridge. I always know what is in the container and what the recommended 'ready' date is. |
Of course I tasted it before I put it in the fridge. Most of it was gone before the 'ready' date, too! It was delicious!


