Showing posts with label sewing project. Show all posts

Sunday, October 7, 2012

Velvet Pumpkin Tutorial

I saw these on Hot Skwash and thought they were great! No way I wanted to pay what they were asking, though.

Here's my knock-off version
After looking at a few blogs and coming up with a few little tricks of my own, I made a bunch. Everyone I've given them to loves them, which always makes me happy.

Now is a great time to find stems at the grocery store or pumpkin patch. They always have some that have fallen off the pumpkins.

These are easy and you don't need a sewing machine to make them.
You do need stretchy velvet, I used Panne, plastic pellet filler (I found mine at Hobby Lobby, but I also saw some at JoAnn's), polyester fiberfill, matching thread, a long needle, craft glue or hot glue.

The sizes listed below are approximate! Your size may be different depending on how full you stuff your pumpkin.

For a 3" pumpkin cut a  6" square of Panne or stretchy velvet.
For a 4" pumpkin, cut a 9 1/2" square
For a 6" pumpkin, cut a 12 1/2" square
For a 7" pumpkin, cut a 16" square

Cut a square of panne or stretchy velvet. (See list above for sizes)

Fold the square into fourths with the right side inside.

Cut the corner off as shown. You can use a bowl if you want, but this works even if you end up cutting an oval (ask me how I know!)

Tie a big knot at the end of a really long thread that is doubled. I used regular all purpose thread because it is stronger. In my tutorial I used brown so you could see the stitches, but normally I use a matching color.

Take large (about 1/4") stitches about 1/4" away from the edge. If your stitches are too small then its very difficult to close the hole in the middle.

Add about 2 tablespoons of plastic pellet filler to the center. I add a little more for larger pumpkins. The plastic pellet filler adds just a bit of weight to the pumpkin so it doesn't tip from the weight of the stem on top. You can use rice or beans, but I always use plastic pellets if I'm giving the pumpkins away. I don't want to attract mice in someone else's home.

I used a little bit less fiberfill than shown in the photo. If you want your pumpkin stiff and full, then add more fiberfill. If you want it squishy and flat, then add a little less.
This is what it looks like with all the fiberfill added.

Pull both the knot end and the needle end tight. Then tie a knot. This is probably the trickiest part which is why you see my farmer hand holding both ends of the thread

Take two stitches across the top in an "X" to close the hole. At this point you can also take a stitch through the bottom of the pumpkin to hold it flatter, rather than having a taller pumpkin.

Bury the threads inside the pumpkin.

This is the type of glue I used. I don't like hot glue, but maybe you are better with your glue gun than I am with mine. Put a dab of glue onto the stem and press it into the top of the pumpkin

Lots of pumpkins!
I think I've made about 24 now. They are easy and I love sharing them. The only hard part is finding stems. So if you have extra stems you aren't planning on using, feel free to send them my way.

Saturday, September 15, 2012

Welder's Cap Tutorial

Vet2Be is welding again. He decided he needed a welding cap. They are kinda soft, backwards ball caps. The bill is worn to protect the back of the neck and they are made out of cotton so they don't burn easily.

They are supposed to be made out of 'unique' fabrics, because welders are very proud of their welding caps!

Taco, Vet2Be's good friend, is a welder, too. His mom, Sheepy, made him a cap and tried to use the pattern I used, but it was very difficult to follow. This tutorial is for her!

Ricochet and Away has a post about a welder's hat. The pattern I used can be found here. The instructions are found here.

All the photos in the following tutorial are mine. I did make two small adjustments so the cap would fit Vet2Be's head better. I'll note them in the tutorial.

You'll need either 1/2 yard of fabric OR two 1/4 yard pieces to make a reversible cap. I used some of Vet2Be's favorites.

You'll also need thread (duh!) and a small piece of flannel or thin batting for the bill. I used flannel because it provides a little bit of weight without too much bulk.

Print the pattern out so that the pattern is the correct size. You can either use your printer's scale function or you can re-size the pattern in a drawing program.

Fabric A: (Clockwise from left) cut one strip for the band that is the same as the head measurement plus 1/2" x 1 1/2" wide. The pattern says 2" wide, but 1 1/2" fit Vet2Be's head much better. Cut four Front/Back pieces, one bill, two Side pieces.

Fabric B: (Clockwise from left) cut one strip for the band that is the same as the head measurement plus 1/2" x 1 1/2" wide. Cut four Front/Back pieces. One bill from Fabric B and one bill from flannel or thin batting. Two Side pieces.

Sewing Directions
 
Bill
Place the bill pieces right sides together with the flannel on the top. Sew around the longer curved edge using a 1/4" seam.
Trim the flannel (or thin batting) close to the seam allowance to reduce bulk.

Turn right side out, press. Trim the raw edges of the bill so that they are even.
Pin around the edge of the bill as shown to keep the fabric from shifting while you are top stitching.

Top stitch close to the finished edge, then add as many top stitching lines as you like. Mine are about 1" apart.
 Crown
 Step 1
Stitch Fabric A side pieces together, right sides together, along the top (short) seam. Repeat for Fabric B. Press the seam open
 Step 2
Stitch a pair of Fabric A Front/Back sections, right sides together, from the bottom to the dot. Back stitch at the dot. Repeat with the other pair of Fabric A Front/Back sections and both Fabric B Front/Back sections.

Press the seams open. I shouldn't have placed my pieces so close together! The photo really shows four different sections if you look closely.
 Step 3
Place the Fabric A and Fabric B Side pieces wrong sides together and pin or secure so they don't shift while sewing.

Sandwich the Side (one A fabric and one B fabric) pieces (wrong sides together) with two of the Front/Back pieces (right sides together) matching the bottom of the crown and the end of the stitching (dot) with the stitching line on the Side piece. Wrong sides of Front/Back pieces face out, wrong sides of Side pieces face in.
Sew from bottom of crown to dot through all four layers.
 Step 4
Stitch the other side seam in the same manner.

Pull the Side section out from the Front/Back section and the seams should all be hidden. Press to set the seams.
Repeat Step 3 with the other two Front/Back sections.
The seam allowances will be encased in the crown of the cap. I trimmed about 1/4" along the bottom of the crown so that it would be even. It also made the cap fit Vet2Be better. I think his head is a little shorter over the top than the pattern allows for.

Band
Sew the short ends of Fabric A band, and Fabric B band. Press open.

Match the center of the bill with the seam of the band. Sandwich the bill between the two bands, matching the fabrics. Using 1/4" seam, sew the long edge in a complete circle. Pull out the bill and press. Press one of the fabrics under 1/4" along the raw edge. (The pressed line will help when you hand stitch the last seam to the crown.)

Match the seam of the band to the seam where two Front/Back pieces come together. Do not place the bill along one of the Side pieces! The cap won't fit correctly! The Side pieces need to be on the side of the head. Sew one raw edge of the band (not the side with the pressed edge) to the crown. Align the pressed raw edge of the band with the seam, covering the seam on the crown. Hand stitch or top stitch the band in place.

Fabric B on the outside.

Fabric A on the outside.
If there is a step that is unclear, please leave a comment and I'll do my best to clarify it.

Sharing this post at Not Just A Housewife.

Update:
Someone used the pattern to make a tutorial for the welder's cap!
Here's the short video


Here's the long video

Sunday, February 5, 2012

Dammit Doll Tutorial

I've been making a few of these for friends and neighbors who are having a frustrating time this winter. It's brought a smile to almost everyone's face!

You can purchase them on a number of sites on the web, or you can make your own. You can do a google search for the poem, too, although I've included it at the end of this post to make it more convenient.

This one is for my sister, she asked for a red one!
Print out the pattern above. There is a 1" test square so you can adjust your printer, but it doesn't matter that much. The dolls can be any size.
If you normally sew alot, the pattern is probably all you need. If you want to see how I do the hair, it's shown at the end of the post.

Pin your pattern and cut out with scissors. I'm a fan of rotary cutters, but not when the curves are this tight!
All cut out. Transfer the marks to the upper arm so you don't sew there.
Dammit! I forgot to sew on the face before I started sewing! It's easiest to sew the eyes and mouth on before you sew the doll together. You can do it after, no worries, but it's easier when you don't have to bury the knot.
Set your stitch length to 1.5 (or whatever a small stitch length is on your machine). It makes it easier to sew around the curves smoothly.
Sew all the way around the doll and clip the seams. You can see the little clips on the inside seams. I clip everywhere there is an inside seam so rounded seams are smoother when you are done stuffing. I also trim really close to the outside curving seams (you can see how close I clipped the seam around the head.)
Turn it right side out. I use a tube to help turning it right side out, but using a dowel or the eraser end of a pencil works fine, too.
Stuff! I use some poly fill, but you can take apart an old stuffed animal and re-use the stuffing, or use pieces of quilt batting.
The photos I took of stitching up the open seam were terrible! Sorry about that. Do the neatest job you can sewing up the seam.

Now for the Hair
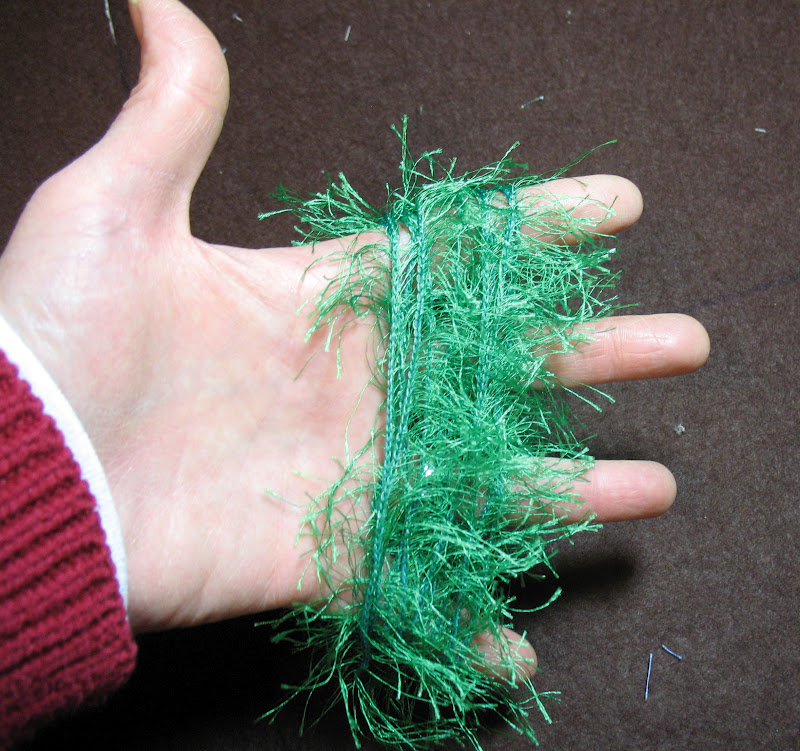
Wrap about 10 wraps of Lion Brand Fun Fur (or whatever yarn you have in your stash) around you hand. The more open your hand is, the longer the strands of 'hair' you will have. 
Slip the yarn off your hand and use your sewing machine on a straight stitch to sew right through the middle of your yarn.
Sorry about the fuzzy photo, if you look closely you can see the white stitching line that goes through the yarn to secure it.
Hand stitch the hair in place along the stitching line on the yarn. This isn't some wonderfully, fantastic doll, it's supposed to be whacked! Don't worry about perfection on this one!
Sometimes I trim the hair, sometimes I don't. This doll's hair was sooooo wonky and long that I trimmed it to make it look better.

 The Poem Tag
Crumple up a piece of paper bag.
Iron it flat, but not too flat.
Print out the poem, rip around the edges (poem is below).
Coat both the paper bag and the poem with a thin layer of rubber cement and let it dry.
Then put the poem on the rubber cement.
Rub the extra rubber cement off the brown paper bag.
Rip close to edges of the poem, punch a hole, add some twine, and the tag is done!
Click on the photo, then download and print.

I took longer to take the photos and write the post than it did to make the doll. It's a pretty quick project.

Honestly, I hope you don't need one! And that no one you know needs one! But just in case you do, it's a fast, fun project to make.