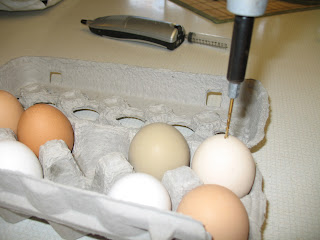
I knew that Sheepy and her family had made some Ukranian decorated eggs and that she had a way to blow out the eggs with only one hole and she had a 'machine' that did it for her.
When I asked about it, she told me she used a small fish tank aerator hooked to the hose with a hypodermic needle on the end. She said she had to be careful because until she got the hang of it, she blew up a bunch of eggs. She said I could borrow her 'specialized equipment.' (Farmers have alot of 'specialized equipment like that!)
Hmmmmm..... I decided that I could probably do the same thing here with thy hypodermic needle on the end of a syringe instead of getting a fish tank aerator.
I didn't want to wait until the next time I saw her, I wanted to try it right now.... sometimes I hatch a great idea and nothing else can get through my head until I get it done!
This works best with eggs that are at room temperature and a drill bit that is sharp. A dull bit will crack and break the eggs.
Next I remove the syringe and needle from the egg, place my finger over the hole in the egg, and shake the egg with the water and bleach inside.
Then I turn the egg so that the hole is on the bottom over the sink, and gently fill the egg with air to force the water and bleach out. I repeated this step twice so that the inside of the egg would be fairly clean and wouldn't end up smelling later on.
The photo right above has a piece of tape over the egg. If I wasn't careful with the drill bit, I would crack the egg, a piece of tape over the place I was drilling helped to stabilize the egg so that the hole would be perfectly round and nice looking.
CooleyBug (my neighbor) is away for a few days so I didn't get a photo of her beautiful egg display yet.... I'll add it as soon as she gets home.
Now.... on to the next project!
Update 4/13/11:
I found that if I put a piece of masking tape with a hole in it at the end of the egg, it makes it much easier to keep the egg from breaking. The masking tape molds to the rounded shape of the egg better than any other tape I tried. The hole in the tape helps the drill to stay in the right spot while I'm drilling.
 |
| The best way to see the hole in the masking tape was to put the tape on the floor. When I put it on the egg for the photo I couldn't see the hole, which wouldn't help anyone looking at the photo! |


2 comments:
I blew out (and up, oops) some eggs last year by using a sewing needle to pierce a hole in each end, and then slowly blowing the insides out with a bicycle pump (with an attached needle). After breaking two or three, it worked wonderfully.
But your method of one hole looks tidier! I'll probably have to try it this year :).
My neighbor, CooleyBug, used a bicycle pump and blew up an egg, too :) I'll have to try the sewing needle to see if the hole is big enough for the egg to come out. My friend Sheepy uses a Dremel tool to put a hole in the egg instead of a drill.
Post a Comment