The block for this month is called Prairie Flower.
Here are my completed blocks. Surprisingly, I was done by January 4th! The teacher said that since we had to cut out (64) 1 1/2" squares it would probably be best to not plan on sewing the block together the night before. So I started the day I got home and finished a few days later. I decided publish the blog post on the first Saturday of the month, just to be consistent.
Here are the instructions we received:
 |
| You should be able to click on the image above and then right-click and save as to your computer. |
And because I knew those tiny squares were going to give me grief, I decided to paper piece them. Here is the pattern I drew up for paper piecing the corners and middle-sides of the block:
Here are some helpful hints that I discovered while sewing this block:
The kit instructions say that we should have 45" of fabrics A, B, and C. My pieces were only 42". Instead of cutting the A1, B, and C pieces 1/4" bigger than the instructions, I was only able to cut A1 to 1 5/8" and the B and C (2 1/2") squares to 2 5/8" (I cut A2 to exactly 2 1/2" because it wasn't part of a smaller sub-block).
Cutting the A1, B, and C fabrics (excluding the center A2) as large as your fabric pieces will allow will let you trim each sub-block to exactly 2 1/2" making it much easier to finish the block to the correct measurements.
I found that I can pin all three pieces of each sub-block to the paper and then sew.
I have one directional fabric so I drew a line on my papers to show which way the direction of the fabric should go. That way when I pin I will get all the lines going in the same direction. Otherwise I would end up with more than half going one way and only a few going a different way. I would probably be the only one that would notice in the finished quilt, but as long as I recognized it as I was starting, I thought it would be best to take care in my pinning and sewing.
Yes, it does take longer to paper piece than to draw the lines on A1 and piece the traditional way. But my squares are turning out exactly 2 1/2" this way and I'm sure that I wouldn't get the sub-blocks to turn out as well if I used the traditional sewing instructions.
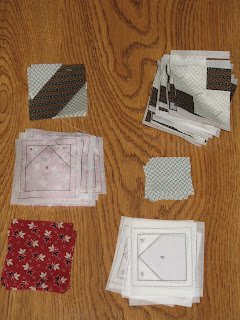
Here's a photo of some of the finished sub-blocks, some of the pinned blocks (from the back) and some of the fabric before pinning.
Clockwise from top left: finished corner sub-block sewn and trimmed, pinned sub-block, A1 squares ready to pin, papers ready for side-middle blocks, B squares ready to pin, pinned side-middle blocks ready to sew.
In the photo above I have already worked 1 1/2 hours on the blocks. The teacher was right when she said don't wait until the night before to start this block! It took me another 3 hours to finish the four blocks.
Here is the full text of the instructions I worked up for my friends.


No comments:
Post a Comment