Saturday, February 27, 2010

How Long Do Fresh Eggs Last?

Someone asked me how long eggs will last. Usually I respond that if you put an egg in water you can tell if it is fresh because it sinks to the bottom of the container and rests there. If it floats, then it is best to throw the egg away.

But that doesn't answer the question 'how long?' so I checked on the internet and found a great answer on Answers. com.

Check out the link here:
How long will fresh chicken eggs keep in the refrigerator?

Here is the text copied from the page listed above:
Various answers by our contributors:
  • Eggs can remain edible for even longer than a month, but freshness (egg yolk that sits firm and high, and a thick viscous egg white) will be noticeably less after two weeks.

    If eggs start out as Grade AA, they remain AA for only two weeks if properly refrigerated. After that, they'll be Grade A for another 2 weeks.
  • Here is a true test of freshness: Get a bowl of cold water. Put the whole egg in the water. If it sinks, it's fresh; if it floats to the top, it is old. It will kind of lay almost on its side. You can see the age of it by how much it floats. It's a good idea to do this test before selling any eggs if you suspect they are older than two weeks.

    However, by putting the eggs in water, you wash away the bloom from the egg, a protective layering that prevents bacteria from entering the egg. Therefore, unless you are not expecting to keep the eggs for very long, you should not put them in water. If you must wash the eggs, use HOT running water.
  • Farmers have 30 days from the day an egg is laid to get it to stores. Then, the stores have another 30 days to sell the eggs. The USDA recommends a maximum of 5 weeks in your refrigerator before you discard your eggs. What does this all boil down to? On April 1, you could be eating an egg that was laid on Christmas.
  • Many eggs in the U.S. get to market within a few days of laying. If there is a USDA shield on the carton, it must have at least a Julian pack date. A use-by is not required, but if used, it must not be more than 45 days from packing. If the eggs are not distributed interstate, state laws will apply and are variable.
  • Keep in mind that farmers generally get their eggs to stores within a week, and both the "pack date" and "sell by" date are stamped onto the carton. The numbers run from 1-365, depending on the day of the year. Lastly, there is a big difference in taste between farm fresh eggs and week-old eggs. If you want the freshest eggs, you can buy from a local farmer.
  • There is an expiration date on the carton. If in doubt, put the egg in water. If it floats, do not use it.
Eggs last about 4-5 weeks in your refrigerator. If you don't know how long the egg has been in the refrigerator, fill a cup with water (enough to cover the egg), and put the egg in the cup. If the egg sinks to the bottom, it is still good to eat, but if the egg floats, it is bad and should be discarded.

Thursday, February 25, 2010

Bone Tumors and Other Updates

Vet2Be has two osteochondromas on his leg. Those are benign bone tumors. One of them broke off and so he has been in lots of pain lately. The doctor will be removing them both next week. But in the meantime, he is supposed to take it easy so he doesn't have swelling in the soft tissue around the broken bone. This injury rode right on the heels of us finding out that he was being 'poisoned' while he slept in the basement because of the melting electrical wires! This kid has had a tough 10 months.

That means that I am doing most of the work on the farm. (Hubby and Son1 are away on a business trip, so everything has been up to me.) With all the work I haven't had time to update my blog!

We cleaned one stall today to get ready for the first  kidding due date: 8 March. Some of the neighbor children that are good friends of ours came by to help. It took two hours to shovel out the stall since it has been such a wet, sloggy month.

There are still two more stalls to clean, but I feel much better having one done. If Clover decides to kid a little early, we have a clean place for her. She looks as if she is going to pop! But she is still eating, and she hasn't bagged up yet, so I think we're okay for a few days.

There is still heavy work to be done, though! One of the other stalls is much worse than the one we cleaned, and the third isn't nearly as bad. We have about 5 hours of work left. Not too bad, but Vet2Be feels terrible that he can't help. I'm very grateful for neighborhood kids who like to be here and help and for good friends who have volunteered to come help clean the other stalls Monday night.

Other Updates:
Mandy the bummer lamb is doing great! She has outgrown the small and medium sized diapers I made for her. Last week I made six more large diapers. I have enough fabric to make a few more in a larger size and then she will be outside full time! She is 4 1/2 weeks old at this point and is in the process of being weaned to lamb starter feed from our local feed supply store as well as some alfalfa/grass mix hay.

Crib for Mandy Since Mandy outgrew her Rubbermaid tote, Carpenter cut off the legs of an old baby crib and used brackets to attach the sides to the ends. It makes a perfect pen for Mandy to sleep in at night or to be in when we don't want her in the yard or the house.

Hot Pads I've been crocheting a few hot pads for friends. I've never seen the pattern for these anywhere on the internet, so hopefully I will have time to post the pattern and some photos of how to do the stitch that Hubby's grandma showed to me.

Vet2Be's Eagle Court of Honor went very well last month! I just haven't had time to post pictures yet. But it was a wonderful evening and we are all very happy that he was able to earn the BSA Eagle Rank.

Saturday, February 6, 2010

Oregon Trail Quilt: Prairie Flower

I found a great video of someone else who unpicks seams the exact same way I do, with a rotary cutter! I thought this would be a great place to store the location.


The block for this month is called Prairie Flower.
Here are my completed blocks. Surprisingly, I was done by January 4th! The teacher said that since we had to cut out (64) 1 1/2" squares it would probably be best to not plan on sewing the block together the night before. So I started the day I got home and finished a few days later. I decided publish the blog post on the first Saturday of the month, just to be consistent.

Here are the instructions we received:

You should be able to click on the image above and then right-click and save as to your computer.


Of course Quilter's Cache has an excellent tutorial found here. However, their pattern makes a 9" finished block and I am sewing 6" finished blocks. So their step-by-step directions are excellent, but I am using the sizes that were given in our instructions.

And because I knew those tiny squares were going to give me grief, I decided to paper piece them. Here is the pattern I drew up for paper piecing the corners and middle-sides of the block:


Here are some helpful hints that I discovered while sewing this block:
The kit instructions say that we should have 45" of fabrics A, B, and C. My pieces were only 42". Instead of cutting the A1, B, and C pieces 1/4" bigger than the instructions, I was only able to cut A1 to 1 5/8" and the B and C (2 1/2") squares to 2 5/8" (I cut A2 to exactly 2 1/2" because it wasn't part of a smaller sub-block).

Cutting the A1, B, and C fabrics (excluding the center A2) as large as your fabric pieces will allow will let you trim each sub-block to exactly 2 1/2" making it much easier to finish the block to the correct measurements.

I found that I can pin all three pieces of each sub-block to the paper and then sew.

I have one directional fabric so I drew a line on my papers to show which way the direction of the fabric should go. That way when I pin I will get all the lines going in the same direction. Otherwise I would end up with more than half going one way and only a few going a different way. I would probably be the only one that would notice in the finished quilt, but as long as I recognized it as I was starting, I thought it would be best to take care in my pinning and sewing.

Yes, it does take longer to paper piece than to draw the lines on A1 and piece the traditional way. But my squares are turning out exactly 2 1/2" this way and I'm sure that I wouldn't get the sub-blocks to turn out as well if I used the traditional sewing instructions.

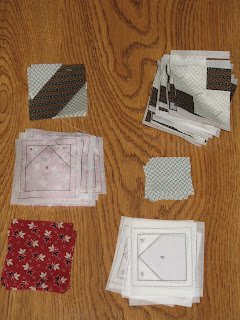
Here's a photo of some of the finished sub-blocks, some of the pinned blocks (from the back) and some of the fabric before pinning.
Clockwise from top left: finished corner sub-block sewn and trimmed, pinned sub-block, A1 squares ready to pin, papers ready for side-middle blocks, B squares ready to pin, pinned side-middle blocks ready to sew.
In the photo above I have already worked 1 1/2 hours on the blocks. The teacher was right when she said don't wait until the night before to start this block! It took me another 3 hours to finish the four blocks.

Here is the full text of the instructions I worked up for my friends.

5 Instructions for Paper Piecing