Tuesday, October 27, 2009

Making Cider!

We had about 30 bushels of apples that we picked from neighbors homes. They were glad they didn't have apples on the lawn to pick up, and Vet2Be was happy to press them into cider and sell it. All the money went into his mission fund, which he hopes to have fully funded by the time he is 17.


Here is the flyer we send around--ours had real names and our address on it, though! We ended up pressing cider until 7:00 pm, instead of ending at 4:00 pm because we had so many apples.


We were able to borrow a press from a very nice person in our town who lives about a mile away. It even has a motorized grinder on it. We were pretty excited about that. We were also able to borrow a grinder from Happy Valley Ranch. They have a wonderful grinder. We attached it to an old fish-tank stand that was really sturdy. Sorry I don't have a photo of it, we were so busy that day that I was glad to get the photos I did!


The cider press we borrowed.


What the inside of the fruit grinder looks like.

Some of the things that we did that were really helpful (we didn't realize at the time, but it really made the pressing easier).

1. Put the press on a pallet. When you are pressing cider there is always some spillage of either cider or crushed apples. The slats on the pallet let the 'stuff' fall through onto the ground.

2. Do it on the grass. The slush and extra water ends up in the grass, not on a cement floor which would get very slippery very quickly.

3. Set up a tent or pavilion above the press. We didn't do this until it started raining. We didn't expect rain on Apple Day, but we never know what the weather will do! A pavilion would keep the rain off or provide shade so that they apples wouldn't brown in the sun.

4. We have some stainless steel food service pans that hold about 4 gallons, they slid right under the cider press which made it very easy to collect the cider. Pouring from the corner into the 2-liter bottles was really easy, too.

Since we didn't have a real pressing bag, I went to Wal*Mart and bought their laundry sorter. Here is a link for a similar one from Target. It cost $15, the real pressing bags were $7 each and I would have had to drive about 45 minutes to get to the only store that has them. The mesh laundry bags held up very, very well and fit inside the pressing bucket perfectly. You can see the blue bag in the photo above, it is behind the press on the pallet.


Here are some of the kids that came to help press the cider. The one with his mouth open is Vet2Be's friend, KidChef. He made apple pies to sell that day. He is saving his money to go to Scout Jamboree spring 2010.

We pressed about 30 bushels of apples on Apple Day and got about 50 gallons of cider. We found a few more bushels of apples that we missed and will do them next weekend when Hubby is home. We sold most of the cider and ended up putting about 8 gallons in the freezer for our family.

We have been saving and collecting 2-liter soda bottles this year. I sanitized them before we put the cider in them. They are free (except for the time it takes to sanitize them) and I don't feel bad about throwing them away after we drink the cider.

Tuesday, October 20, 2009

A New Driveway

Our old driveway was worn out years ago, but we haven't had the money to replace it until this year. Instead of cement, we chose asphalt. It will be a bit hotter in the summer on the south side of the house, but it will be much nicer in the winter because the snow will melt faster. It will also last much longer than cement.


 The old driveway all torn up. It was really nice to be able to pay someone else to do all this work for us. 


 The new driveway all done! Smooth and beautiful!

Tuesday, October 13, 2009

German Pancakes

We love German Pancakes made from duck eggs. They are so much better than when they are made from chicken eggs.

Here is the recipe I use:
  • 4 duck eggs
  • 2/3 cup goat milk
  • 2/3 cup flour
  • dash salt
I blend all the ingredients in a blender while the oven is heating to 400˚ F. I have a wonderful old cast-iron fry pan that I put in the oven with about 2 Tablespoons of butter in it when the oven gets to about 350 ˚F. This recipe works best when the fry pan is heated before I put in the pancake mixture, but I don't want the pan in the oven too soon or the butter burns.

When the butter is melted and the pan is heated, I pour the mixture into the pan and set the timer for 18 minutes.

This is what comes out of the oven! Yummy! Vet2Be can eat a whole one all by himself.


Our family likes to top their German Pancake with Cherry Pie Filling or powdered sugar. Fruit and whipped cream would also be delicious!

Monday, October 12, 2009

Apples Trees

My good friend, who gave us all the grapes, has a friend who has an apple press. Last year we were able to go down and press the apples from our neighbors trees into cider. It went so fast! It took us 5 hours total to pick the apples, clean the grass under the trees, and make 11 1/2 gallons of apple cider! If I had to pick only one juice to store, it would be apples because it is so fast!


Two of the neighbors trees that Vet2Be and Hubby pruned and cared for this year. I have no idea what type of apples these are. They made great apple cider last year. We just opened the last 1/2 gallon last week.


It has been a spectacular apple year. Everyone I know that has apple trees has been loaded. We had a long, cool spring with lots of rain. Very unusual for this area, but the apples loved it.

Saturday, October 10, 2009

Busy Week

Hubby has been gone since Monday and won't be back until Wednesday leaving Vet2Be and me to take care of things on the home front. We've been busy!

This morning we took a trip to the farm store to buy grain and feed for all the animals. Vet2Be also needed a new Sunday shirt and Sunday shoes before tomorrow since he has grown about 4" this year. Not only has he grown taller, he has grown stronger. Lifting 50 lb bags of grain is really easy for him now. He is really enjoying that!

This afternoon we filled the wood box with wood for the stove, as well as filling two plastic totes with kindling. Both are by the back door to make it easy to bring wood in to start a fire. We had some help from two young neighbor boys who love to be here with all the animals and they like the work, too. They did a great job! Not only did they fill the wood box themselves while I was filling the kindling boxes, they helped spread the pine needles in the poultry pen. Their mother said all her children think of our farm as Welcome (to our other) Home Farm, since they feel so at home here. I loved to visit my Aunt's farm when I was growing up and Hubby's grandparent's farm after we were married so I am glad other families feel the same way contentment when they visit here.

The last few years we have used pine needles in the poultry pen. They are stiff enough that they keep the pen dry or at least keep the chicken's and duck's feet out of the muck below. The year we used straw it was a mucky mess all winter and difficult to clean in the spring. Even though the pine needles are stiff, they don't seem to bother the duck's or chicken's feet, which was a concern the first year we used them. Our neighbors like to bring over their pine needles, too! It saves them the time of burning them or bringing them to the green-waste facility. In the spring the pine needles are ready to spread on the garden and till in. Our soil is alkaline here so the pine needles do a great job of adding some acid as well as loosening up the clay soil.

This week we also swept out the barn, cleaned buckets, and got some of our does bred to our buck. We're still milking every morning. And the new ducks have just started laying eggs!

We got a new driveway this week, too! Yipee! The old cement driveway was a gravel pit at the end and has needed to be replaced for about 4 years. It is nice to have an asphalt driveway that is smooooth!

We picked 3 1/2 trees worth of apples this week, too. Right now we have about 25 bushels of apples stored in the barn. We'll pick the rest of the fourth tree this coming week. Hopefully we will be able to make cider from either a rented or borrowed cider press. I wanted to have a press of our own this fall but with so much traveling back and forth to the East Coast this summer, a cider press is not in the budget.

We are hoping to have a small "Harvest Day" on our farm and sell whatever cider we don't have room to store. There are plenty of people who said they would love to see a cider press and how it works. We'll invite neighbors and friends over to watch us press the apples, sample the cider, and bring containers to fill. We've got other neighbors who are selling pumpkins this fall, and another neighbor who sells honey. We'll invite them to sell their goods that day, too. One of Vet2Be's friends wants to be a chef so he picked 2 bushels of apples and he will bring some apple treats to sell so he can also earn some money.

I made 2 batches of goat's milk and oatmeal soap on Monday. One was scented with Cranberry and the other was scented with Grapefruit. My neighbor heard what I had made and asked if I would teach the girls in our church's youth group how to make soap. So I taught another soap making class on Wednesday evening to some of the girls in our church's youth group. They loved it! The idea that goat's milk soap with oatmeal might help keep their skin clear was a big incentive to learn how to make it themselves. Apparently the local 'fancy' store sells goat's milk soap for $8 a bar. Each of the girls and their leaders went home with a small 1 1/2" by 2" bar of soap that smelled lovely. Their leader picked out a scent called Red Current that was light and refreshing. It filled the whole kitchen with a wonderful smell.

We had a great time on Friday evening! One of my other friends is knowledgeable about Navajo rugs, Navajo Churro sheep, and Navajo history. She came with her family and gave a wonderful presentation to 3 homeschool families. She and her husband did a fantastic job teaching us all sorts of interesting things about the Churro sheep and rug making. She has a beautiful collection of rugs and a Navajo loom that she showed us. Her son also demonstrated how to use a Navajo spindle. Hopefully I will get the pictures from one of the mothers that was there with a camera and post them sometime.

I haven't cleaned out the flower beds or the garden yet, but since I work part-time and we homeschool, it was a busy week getting everything done without Hubby's help. I'm glad that the leaves haven't fallen off the trees yet, too. I don't think I could have squeezed one more thing in this week!

I often look forward to the change in seasons because it means a different type of work. As we change from summer to winter, my work changes from gardening and outdoor farm work to more indoor work like knitting, sewing, and spinning. Today is one of the days that I am really looking forward to sitting in front of a warm fire and doing some hand work with the dogs sitting by my feet, Vet2Be reading in the chair next to me, and some pleasant music in the background.

Tuesday, October 6, 2009

A Doll Bed for My Niece

My niece has an American Girl Doll and she showed it to me when I was visiting in July. I'm not very good at sending birthday gifts, but if I find something that I think a niece or nephew will like, then I try to send it to them.

I found a doll bed at a local church's yard sale a few months ago. I bought it because I remember my niece's doll slept in a cardboard box. I promised her that if I found a bed at a yard sale, then I would send it to her. I could afford this little gift and I knew that I had enough material at home to make a mattress, pillow, and blanket to go with the bed.

The bed needed a few repairs, tightening the ropes, re-staining the scratches, and gluing some of the joints. It still looks used, but I think my niece will like it anyway.

Here it is all done and ready to ship. I just need to find a box that it will fit in.


I used Red Heart Light and Lofty for the doll afghan. I don't like this yarn as well as I like the Lion Brand Homespun. The Lion Brand has fewer fluffies sticking out and is easier to knit.


A few years ago I made my mother a quilt out of Civil War reproduction fabrics. She loved it. I made the mattress out of the same fabric that I used in part of my mother's quilt. I gave my sister (my niece's mother) the quilt since my mother passed away. I hope it brings her lots of comfort. And I hope that my niece likes her gift.

Monday, October 5, 2009

Cinnamon Rolls

One of my families favorites treats is homemade Cinnamon Rolls. Mine starts with a Potato Bread recipe and is topped with Cream Cheese Frosting! Vet2Be asked for these on Sunday morning. There was no time to make them before milking (they take me about 2 hours to make), but I was able to make them on Sunday afternoon. This recipe makes 2 jelly-roll pans of cinnamon rolls. I use the same roll recipe for Thanksgiving rolls, but I reduce the sugar to 1/4 cup.

Potato Rolls
  • 2 1/4 cup water
  • 1 1/2 medium potatoes chopped finely
  • 1 Tablespoon salt
  • 1/2 cup butter, divided
  • 1 1/2 cups buttermilk
  • 1/2 cup sugar
  • 2 eggs
  • 3 Tablespoons instant yeast
  • 9-11 cups flour
Cinnamon Sugar Filling
  • 1 1/2 cups brown sugar
  • 1-2 teaspoons cinnamon 
Cream Cheese Frosting (recipe at the end of post) 

To make the dough:

Put water and potatoes chopped into a sauce pan and boil the potatoes about 12 minutes or until soft.

Put potatoes and water into a blender and blend until smooth. Add water (if needed) until the cooked mixture is 2 2/3 cups.

To blended potatoes and water, add 1 Tablespoon salt and 1/4 cup butter. Blend until butter is melted.

Add 1 1/2 cups buttermilk, 1/2 cup sugar, and 2 eggs. Blend until smooth.

In the mixing bowl, mix together 4 cups flour and 3 Tablespoons instant yeast. Mix well. Pour liquid into flour mixture and mix until smooth.

Let rest for 10-15 minutes or until you see bubbles in the dough. (Although I use instant yeast, the dough turns out better when I use this method. You are welcome to follow your own bread making directions.)

Add enough of the rest of the flour to make a smooth, elastic dough.

Place to dough in a greased bowl, turning the dough once to coat the whole ball of dough with grease. (Or you can spray the top of the dough with Pam or another spray coating.) Cover the bowl with a towel and let the dough raise in a warm spot for about 1 hour or until doubled in bulk. You will know if it is ready if you can press two fingers lightly into the dough and the imprint remains.

While the dough is rising make the Cinnamon Sugar Filling by mixing together:
  • 1 cup brown sugar
  • 1 Tablespoon cinnamon
Roll out dough into a rectangle on a floured surface. Spread with 1/4 softened or melted butter (or enough butter to cover the dough) and sprinkle the cinnamon sugar filling over the dough.

Roll from the long side and cut into 3/4" - 1" slices. Place on 2 jelly roll pans (or cookie sheets) lined with parchment paper (or greased). As you place each cinnamon roll on the pan, make sure they are just touching each other. They are softer  after they are cooked if you do this. Let rise until doubled in bulk. Place in a 350˚ F oven and bake for about 12 minutes or until the rolls are just starting to brown.

Take out and let cool (at least let them cool a few minutes so you don't burn your mouth!) Don't frost until you are ready to eat. Sugar is hygroscopic (it absorbs lots of water). If you frost them now, the frosting absorbs the moisture from the cinnamon rolls and you end up with dry cinnamon rolls tomorrow. If you are making some for a neighbor, send some frosting over in a ziplock bag or a small disposable container and let them frost the cinnamon rolls when they are ready to eat them.

Cream Cheese Frosting
  • 1- 8 ounce package cream cheese, at room temperature
  • 1/2 cup butter, softened
  • 2 teaspoons vanilla
  • 4 1/2  - 4 3/4 cups powdered sugar
Mix well until smooth. If the frosting is too stiff, add heavy cream (or milk) 1 teaspoon at a time until you like the consistency. Refrigerate unused frosting.


Remember, no frosting until you are ready to eat one!

I hope you enjoy this recipe as much as our family does!

Sunday, October 4, 2009

Loving animals....


Our very good friends lost their puppy this week. Charlie was one of those puppies that not only loved kisses, hugs, and attention, he thrived on them. He was happy to see the children whenever they wanted to play and he was content to play in the yard by himself, too. He proved that the third time is the charm since the other two puppies they had tried before just didn't fit in their family of seven children. They loved him so much and he brought such joy to their family.

He carried his bowl in his mouth like Snoopy, and he even flipped it in the air like Snoopy. He had a squeaky rubber hamburger that was one of his favorite toys. Sometimes he would just hold it in his mouth and make it squeak over and over.

He was also a curious puppy, as many puppies are. He found the mouse poison that had been set in their shed. No one had any idea that he would be able to get into it. They had no idea that Charlie would find the poison enticing, either.

My friend called us late in the evening after they had figured out why Charlie had not been feeling well all afternoon. We looked up the treatment and they tried it, but it was not soon enough. Charlie passed away during the night.

I feel so badly for this family. I remember when we lost one of our goats because we didn't know the symptoms of bloat and we didn't know how to treat it. By the time we figured it out, it was too late. We knew it was our fault that our beautiful goat had died. But it was because of our inexperience and lack of knowledge, not because we intended to kill him. I think that Heavenly Father knows our intentions and I think He understands that we are doing our very best to take care of the gifts that He has given us.

Our friends had no idea that Charlie's symptoms indicated that he ate mouse poison. They feel horrible and I wish there was some way to comfort them. I know they are planning on another puppy as soon as they can find one as sweet as Charlie. I'm glad that they have room in their hearts for another dog. The new one won't replace Charlie, but a new puppy will comfort them and ease their heartache.

I believe that all animals go to heaven and that Heavenly Father knows what is in our hearts especially when we are inexperienced and we are doing our best.

I thought I would post the link that we found the most helpful just in case I need it again sometime. I hope I never do, and I hope that no one I knows needs it, either.

 From the website: "The symptoms you'll see are lethargy, weakness, cold limbs, and pale gums. You may also notice bloody urine, blood in the stools, and nose bleeds. If you see your pet ingest rodent bait or suspect that it has, do not wait for symptoms to show, it maybe to late if you do"

Saturday, October 3, 2009

Oregon Trail Quilt: Kansas Dugout

My friend got me started on another quilt. We are blessed in our area with a number of quilt stores that do a 'Free Block Club' and class. After you sign up for the class time you want to attend, you pay for the first kit that includes the pattern and fabric to make four blocks of the same pattern. If you get those four blocks done before the next class, the next kit is free!

This year's class is called Oregon Trail. The classes run each month from September through the following August. The quilt blocks will all have something to do with the pioneers that crossed the United States using the Oregon Trail. There are three different color-ways we could choose from: Neutrals, Reproduction 30's, and Reproduction 1860's. I chose the Reproduction 1860's fabric.

September's block is called Kansas Dugout. Although I did not use the pattern from Quilter's Cache, the site gives similar directions to the ones that I received at the store.


The pattern they gave us in class.
You should be able to click on the image above and then right-click and save as to your computer.

Here is one of the photos they shared in class of a real Kansas Dugout. I can't put the photo in the blog entry because it would probably be copyright infringement. But the link above will take you to a photo you can look at. And here is another page with information about Prairie Dugouts. One of the fun things about the class is that they teach a mini-history lesson along with how to sew each block.


 September 09, Kansas Dugout, Free Block Club and Class
Photo of my September blocks completed and ready for class!

Each month we will receive a new pattern and fabric to make the next four blocks. Hopefully I will be able to keep up and get my fabric and patterns for free! And I hope to post my progress each month, too.

Friday, October 2, 2009

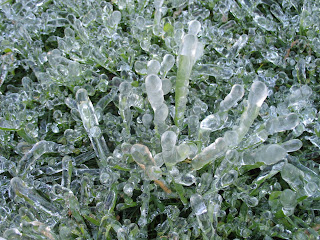
Ice in the Pasture

Vet2Be went out to the pasture and saw a glistening field of grass this morning.
Here are a few photos of what the pasture looked like.


Thursday, October 1, 2009

Fall Chicks?!

We went out to the barn Wednesday morning to milk and Vet2Be saw Midnight (the cat) looking as if she was listening closely to something in the hay stack. Vet2Be went over and listened, too. He thought he heard a bird caught in the hay somewhere so he went looking around on top of the pile of hay bales to see what he could find.

He found a hen sitting on a nest of eggs with 2 chicks. Then he noticed that some of the chirping was coming from a different spot! He looked between the outer wall of the barn and the inner wall and saw another chick about 8 feet down.


That is a long way down!

He was wondering if there was any way to get the chick out. Yup! A net duct-tapped to the end of a long pole. The other option was to move the entire 4 1/2 tons of hay out of the way and remove the bottom 2x6 to get to the chick. Needless to say, he decided to try the stick and net idea.

It took him about 45 minutes to get the little chick out of the narrow between the walls area and bring it safely to it's mother hen. He was very happy with himself! So was I. It took lots of dedication to stick to that task. No complaining, no giving up, he just kept at it until he got the chick out.

In the process of trying to get the chick out, he also dropped the camera down the hole. After he got the little chick out, it only took him a few moments to grab the camera out with a hook attached to the bottom of a pole.

He decided that the floor was a better place for the hen and her chicks so he gathered up the new family and put them in a dog crate on the floor of the barn. Hopefully they will be warm and safe down lower.

And of course..... last week I decided that there was no reason to keep the chick starter crumbles that were left over from the last batch of chicks earlier this summer. We dumped all of it into the chicken feeder and let the poultry finish it off. I thought it was better than letting the mice get into it over the winter. So Vet2Be had to crush up lay pellets to make sure the little chicks had something they could eat. I don't know how well they will do with lay pellets, but I am not going to buy a 50 lb bag of chick starter in the fall!

I'm glad the hen hatched out her chicks. It is always easiest for us when the mama raises her own young and we don't have to help. I can't imagine raising chicks at this time of the year. Yesterday winter hit here, too, so it was cold and rainy. I really don't want to try to keep these little ones warm and dry right now. I'm glad they have a mom to take care of them.

 
There is one of the chicks to the left of the hen.