We have an acquaintance who has posted on a few of the yahoo groups we use. Here is what she asked for:
Looking for a Place with land...
Our landlord is wanting to sell the place we just moved into a few months ago. She'd like it if we moved out.
Hubby and I have been discussing it before she even brought up the subject.
We've been feeling pulled to move to somewhere where there is land, trees and a place we can grow food, raise chickens and goats. We'd love something we could rent or preferrably rent to own. We really don't want to have move again after this time. I'd love to live in H--- or L---, but anywhere along [the center of the state] is fine. We could go as far as B--- [north of her current city] if need be. My hubby works repairing and selling iphones. He uses [a local online classified] for most of his business, and we don't know of anything like that anywhere else or we would consider moving to another state, or to [the southern half of the state].
We can afford about $1200/mo...give or take. Preferrably less, but that would depend on how much land.
Let me know if you know of something that fits my description. We just want to be self-sufficient as much as possible...we cannot do that here. I cannot plant a garden or even a fruit tree at our current location.
I hope that this gets to someone who knows of a place for us!
Thank you in advance.
Here is some of her background:
They have never farmed or raised animals. The have had a small family garden.
She has severe epilepsy and quite often is not allowed to drive a car. Sometimes she is in bed for days at a time after an attack, and often has had to go to the hospital for tests or emergency care.
They have 5 kids, 3 of whom live at home.
They used to live in a very nice 3,500+ square foot new home--until they lost it due to foreclosure.
Here is what I wrote back to her:
I am assuming that the most important things you are looking for are animal rights and water rights [we live in the desert and the right to use water does not come with agricultural land unless you buy it]. If you don't have those, you can't do what you want. Any size house in live-able condition would be okay because I'm assuming that your first goals are raising a few animals, raising a garden, and letting your kids have some space to run. (Same goals as we have--which is why our house is comparatively small, fairly old, and in need of repair.)
Just as a little information for you, it costs us approximately $200 each month to raise our animals. That includes feed and electricity for the barn. It doesn't include things like fencing that might need to be repaired or vet bills (if you can find a vet to help with large animals) vaccinations or meds that the animals might need, building shelters (like a chicken coop), feeders and waterers for the animals, loss of animals to predators, spring-time repairs, breed fees (for the goats), hoses and sprinklers, shovels and other 'out door' tools (pick-axes, pitch forks, manure rakes), bedding for the animals.... We LOVE what we do.... we really love the lifestyle, but to get set up is very costly, we grew into it gradually.
We were also blessed to run into some very good goat people--which means we paid a bundle for our first goats, but they were worth it because we knew they came from healthy, good milking stock--not just auction animals. We also know enough people that we can 'scrounge' materials for some things (old fencing for around the garden, old hay bales for temporary winter shelter, friend's kids that are willing to help us in return for our help....) But that took years of doing what we are doing to be part of the network in the state.
And if you don't own a truck with either a trailer or a shell, you will need to figure that into your cost. If you are planning on goats, you need some way to transport them from here to there as well as picking up feed from the store. It doesn't matter what type of pasture you have, if you want goats or other smaller livestock you will need feed through the winter. If you want goats to give you milk, you will need grain feed all year. You are probably planning on hauling your own hay--which means you are going to need a good sized truck--a little pick-up can't do the job.
It would be a good idea to go to the library and check out a book called "Hobby Farming for Dummies". It is written by Theresa A. Husarik who lives in an area similar to ours. You might also want to go to the library and check out any Storey Guides you can find (Storey's Basic Country Skills, Storey's Guide to Raising Chickens, Storey's Guide to Raising Dairy Goats, and Barnyard in your Backyard). Reading a few books will give you a better idea of what is involved and what type of land, fencing, and water needs you will have.
I'm not trying to discourage you, I think it is a great idea, but I don't want you to walk into it blind and think that hobby farming is easy or will reduce your living costs by much. It will take lots and lots of your time, and lots of hard work. I don't want to see you get the set-up and then realize that every day of the rest of your life has outside work that needs to be done.... there is ALWAYS something that needs to be done. And you don't get to go on vacation unless you add the cost of hiring someone to come into your farm and take care of the animals.
It was 10˚F this morning. It took 30 minutes to haul buckets of water, clean out one water bucket that was nasty, feed all the animals breakfast, and collect the eggs. In the summer we plan on 60 minutes of barn chores in the morning and 90 minutes at night. That doesn't include extra time on Saturdays for maintenance.
YES, YES, YES! It is worth it! At least it is for our family. There are many, many other people (even in our own neighborhood) who think we are crazy! Our attitude has been, "We can't send our kids to a private school to learn what they've learned here. There aren't any private schools like that, and if there were, we wouldn't be able to afford them." But also understand, that our kids WANTED this. We didn't choose this for them, they wanted this and we followed what they wanted. That means we have very willing and mostly un-complaining helpers who do a job and do it thoroughly to the very best of their ability.
I don't want to discourage her, but I'm not sure what to say to her to make sure she understands what a commitment and change of lifestyle she is facing.
So many people think we are self-sufficient on our little place. Far from it! Without the local feed store and local hay growers, we would never survive. There is a reason we call it Hobby Farming, because like every hobby, it rarely pays for itself in our area.
She's a nice lady, and they are a nice family, but they are talking about moving out of the city and into the country with little idea of what they are getting into.
Friday, December 31, 2010
Saturday, December 25, 2010
The Grand-puppy Misses Us!
I haven't posted for a while. The 'Crazy Christmas Craft Craze' was on and, boy, was it a doozy this year! I'll be catching up over the next week, but Spunky posted this picture today and I decided to just do a quick post.
I sent 6 mini-stockings to our daughter, Spunky, who moved far away this fall. We miss her. Apparently her dog does, too.

This is one of the stockings I sent. I think Surry stole it off the tree. Spunky says that she carries it around with her all day! It probably still smells like our house. Surry used to come visit and we would always puppy-sit when her 'parents' were gone camping or on vacation. She loves the farm and our dogs. They get along well and play for hours in the yard.
Once in a while, when they lived closer and I was visiting for a minute or dropping something off, Surry would run out the front door and sit by my car. She wanted to come visit her 'cousins'. So... Spunky would let her get in the car and come with me. Then she would stop by later and pick Surry up.
What a funny puppy!
Monday, November 29, 2010
Bah! Humbug!
Not really..... this is a White Elephant gift for a lab party that Prion will be going to.
The patterns were free at KnitPicks, one of my favorite knitting supply companies.
I knit the Santa Hat on the my Silver Reed knitting machine. Instead of a white garter stitch band, I used a hung hem. It was the first time I used my new garter bars from Kris Krafter, and I loved it!
I hand knit the Grumpy, lump of Coal by hand.
The project was alot of fun to do. It took me about 2 1/2 hours to make the whole thing. Vet2Be asked me to make one for his White Elephant party, too.
 |
| I tried a few times to make him look angry, but it ended up turning out funny looking instead. Vet2Be said that I'm just too happy most of the time to make something look grouchy. Thanks Vet2Be, I'll take that label any day! |
I knit the Santa Hat on the my Silver Reed knitting machine. Instead of a white garter stitch band, I used a hung hem. It was the first time I used my new garter bars from Kris Krafter, and I loved it!
I hand knit the Grumpy, lump of Coal by hand.
The project was alot of fun to do. It took me about 2 1/2 hours to make the whole thing. Vet2Be asked me to make one for his White Elephant party, too.
Saturday, November 27, 2010
Booster Fan
We have problems keeping the great room warm. It's a big room with a vaulted ceiling, and it is an addition. The people who built the addition jury-rigged the heating vents by taking one vent from the living room and re-routing it through the basement, splitting it into two ducts, and then installing them into the great room.
It didn't work very well.
We aren't ready to re-do the duct work in the basement, which is what should happen.
We use the woodstove almost every day in the winter to keep this big room reasonably warm without roasting the bedrooms. Sometimes we have 'red burn' days that they ask people not to burn because the air is so bad. We will usually use the stove anyway because it is the only way to really keep that room warm.
A few months ago Son1 fixed the holes in the duct work, which helped a little, and we also found a booster fan for the vent.
It's pretty noisy so I would never use this in a bedroom, but it works well in the great room. It turns on when warm air starts to go through, and shuts off automatically when the air is cooler. It can be set to work with either the furnace or the air conditioner.
I found some online that replace the heater vent, too, but they were more expensive and I didn't want to spend more money to find out if this would work or not.

We have another register in the room, but since it is under the table I haven't put a booster there. Also, since they are noisy, I'm not sure I would want another one running at the same time.
We're pretty happy with how it brings more warm air into the great room, so I'm glad we bought it. I still like having the woodstove going. To me a fireplace or woodstove is more than a source of heat, it is a source of peace and quiet, a nice place to gather, and it lends a soft and gentle feeling to the room.
Friday, November 26, 2010
Christmas Stocking Marathon
Son1 wanted me to knit some min-Christmas stockings for some of his friends at the University. I got nine finished and ready to go! Yay!
Prion needs five stockings for her friends. I'm working on those now. Blondie (a s-i-s..... Sister-in-Spirit) needs two more for her family.
This happens every year! A mini-Christmas Stocking Marathon! Some years I have made more than 60 before Christmas!
I love knitting them, though. They are fast, easy, and I can watch old Christmas movies while I am stitching them together.
The funny thing is that every year I have to dig out an old one and figure out the pattern again. One of these days I'll write it down and be able to get to work just a little faster!
What are your favorite Christmas movies? I've already watched White Christmas and Christmas in Connecticut. I would love to know what other people have in their collection, it might just be something I can add to mine!
Update: 11/29
Here are the rest of the stockings that I knit. 17 stockings in three days!

Prion needs five stockings for her friends. I'm working on those now. Blondie (a s-i-s..... Sister-in-Spirit) needs two more for her family.
This happens every year! A mini-Christmas Stocking Marathon! Some years I have made more than 60 before Christmas!
I love knitting them, though. They are fast, easy, and I can watch old Christmas movies while I am stitching them together.
 |
| The stocking second from the left on the top row has plain white yarn for the trim. That's because it is for a boy. The other stockings all have a baby yarn for the trim, which has just a little bit of sparkle in it, perfect for all the girls. |
What are your favorite Christmas movies? I've already watched White Christmas and Christmas in Connecticut. I would love to know what other people have in their collection, it might just be something I can add to mine!
Update: 11/29
Here are the rest of the stockings that I knit. 17 stockings in three days!

Thursday, November 25, 2010
Make-shift Shelter
Vet2Be and I built this make-shift shelter for two of the goats. Hubby didn't realize that when I said we needed one more shelter for winter that I really meant it.
So this one is built out of straw bales that we got for free. Since it is for goats, we had to stack the bales as if they were legos so that they wouldn't be easy to knock over. The boxes are filled with straw and are just like the little, square legos that the kids use to fill in the sides.
It's very cozy and warm inside. It fits the two goats very well. Annie was born this spring, so she is only about 100lbs now and can walk inside the door without scraping her back. She is being bred to Curly who is two, but still not full grown. They can both stand inside and lay down with a little bit of wiggle room.
We really only need the shelter for a few more weeks while Curly is here. He's just visiting Annie for about a month. We'll probably leave the shelter up all winter, though and throw the straw into the garden in the spring.
So this one is built out of straw bales that we got for free. Since it is for goats, we had to stack the bales as if they were legos so that they wouldn't be easy to knock over. The boxes are filled with straw and are just like the little, square legos that the kids use to fill in the sides.
 |
| Here's a view of the back. Lots of rocks, pieces of cement, and junk holding down the sides of the tarp so it doesn't blow away in the wind storms. |
 |
| The front entrance. Vet2Be and I call the spot to the left the 'kitchen' because we put their hay inside. |
It's very cozy and warm inside. It fits the two goats very well. Annie was born this spring, so she is only about 100lbs now and can walk inside the door without scraping her back. She is being bred to Curly who is two, but still not full grown. They can both stand inside and lay down with a little bit of wiggle room.
We really only need the shelter for a few more weeks while Curly is here. He's just visiting Annie for about a month. We'll probably leave the shelter up all winter, though and throw the straw into the garden in the spring.
Wednesday, November 24, 2010
Happy Thanksgiving!
I love vintage postcards and illustrations. I know life wasn't any simpler then, but there is a warmth in their drawings and images that brings me a feeling of peace.
Our holiday will be spent with most of our children and some friends at our home on the farm. Hopefully some wonderful memories will be made for all!
I hope you and your family have a wonderful and blessed Thanksgiving Day, and a beautiful beginning to the rest of the Holiday Season!
 |
| This image courtesy of http://vintageholidaycrafts.com/ |
 |
| I'm not sure where I found this image, but I think it is lovely, too. |
I hope you and your family have a wonderful and blessed Thanksgiving Day, and a beautiful beginning to the rest of the Holiday Season!
Monday, November 22, 2010
A Happy Cat

This is Stinky. Her 'real' name is "Pretty Stinky" because she's a very pretty cat, and when she was younger she had gas. Now that she's older, she can be a stinker by starting little disturbances with the older cat, Cookie.
Stinky loves to curl up on our bed every morning. I love looking at her. She looks so cozy and comfy. There are days that I think it would be wonderful to be a cat and curl up comfortably on the bed and enjoy a morning nap.
Sunday, November 21, 2010
Family Theater
I found Old Time Radio Network a few weeks ago. Family Theater is found here.
It has 30 minute broadcasts of radio plays. The show ran from 1947 - 1957. I've listened to more than 30 already. The stories are wonderful! Most are happy and uplifting. All have stories with a message that is appropriate for families.
They had no commercial sponsor and many well-known Hollywood actors and actresses. Surprisingly, all the actors and actresses of the time support happy families and family prayer.
There are a few wonderful Christmas programs that I've been listening to. I've been able to record them with my computer, too. One of the Christmas gifts I will be sending to family will be a CD with a few of those old Christmas programs, hopefully it will be a time that my family can gather their families around them and enjoy, not only nostalgic radio programs, but the time they will spend with each other.
Saturday, November 20, 2010
A "Hippy" Snowflake
I had a few minutes the other day and made a 'hippy' snowflake with Sharpie Markers and alcohol. I think it turned out cute! Two friends stopped by yesterday and I showed it to them. They thought it looked like so much fun they are going to try it with their grandkids.
Here is my first post using a milk filter to make a snowflake.
I put the milk filter on a paper plate so that the Sharpie Marker wouldn't get on the counter. If I was going to do this with children, I would use a paper plate lined with a paper towel. The pellon milk filter is made to let liquids pass through, not absorb them, so the rubbing alcohol needs someplace to go. I decorated the milk filter before I cut it out. I suppose you could color it and use the rubbing alcohol on it after you cut it out, but I think the colors blend better when it is done before cutting.
One of the other things I tried was cutting the milk filter with a craft knife as well as scissors. The milk filters are so much nicer to cut than paper that I could cut shapes anywhere I wanted! I didn't have to cut only on an edge, I could lay the snowflake down on my cutting mat and cut shapes out of the middle of the flakes.
I've got friend who is probably in her late 50's who was never taught how to cut snowflakes. Next week I plan on bringing some milk filters and all the other supplies I need over to her home and we'll make a few snowflakes together. I've already told her I'm coming, and she is very excited! Me, too!
Here is my first post using a milk filter to make a snowflake.
 |
| My Hippy Snowflake! |
One of the other things I tried was cutting the milk filter with a craft knife as well as scissors. The milk filters are so much nicer to cut than paper that I could cut shapes anywhere I wanted! I didn't have to cut only on an edge, I could lay the snowflake down on my cutting mat and cut shapes out of the middle of the flakes.
 |
| You can see in this photo that I not only cut from the edges, I cut shapes out of the center of the side using a craft knife. |
I've got friend who is probably in her late 50's who was never taught how to cut snowflakes. Next week I plan on bringing some milk filters and all the other supplies I need over to her home and we'll make a few snowflakes together. I've already told her I'm coming, and she is very excited! Me, too!
Friday, November 19, 2010
A Basket for Yarn!
I've been watching at the local thrift store hoping to find a picnic basket that will work to store some of my extra yarn in under the knitting machine. The ones I've found so far were not something I could use. Some had fabric lining, which would be nice, except they had food stains and mold and I wasn't sure I could get the food stains or the mold out. Some were wicker on the inside and I didn't want to spend time on lining it, there are plenty of other projects to do! Some didn't have handles, some had no lids, some were in terrible condition and would have been best suited for the garbage.
But the other day I ran across a wonderful find! It is a large basket with a press board interior. The press board is a little warped, but it isn't stinky or moldy. The basket has a lid and two handles, and all three work! It fits under my knitting machine to hold the yarn for the current project. And it was only $5!
What a lucky find!

Patience, patience, patience. I've learned that if I know what I want and I am patient, I find it eventually, usually sooner rather than later. I've gotten so good at finding things that I have a list from several different friends that have asked me to keep an eye out for something for them!
Still looking for a 1952 edition of Great Books of the Western World for my daughter. We have one for the family, but she is such a lover of books that she wants her own set.
Do you have things that you keep your eye out for?
Thursday, November 18, 2010
Turkish Drop Spindle
I am often blessed by Sheepy and her family's woodworking skills. I try to reciprocate with cheese from time to time, but I often get the better end of the friendship.
In December our family will be part of a live Nativity. I was asked to sit where the wool and spinning wheel is. Vet2Be will be tending the sheep using his own shepherd's crook.
I've been to this live Nativity the past two years. One family started it in memory of their mother and as a fund-raiser to donate to the hospital that took loving care of her in her last days.
It is a town set up with different shops and places to visit. There are always camels, sheep, goats, Roman soldiers riding horses, wandering people, and a wonderful spirit.
I have noticed that they have always had a spinning wheel at the wool shop. Of course, I never said anything, but spinning wheels weren't invented until the middle ages.
I asked Sheepy if she happened to have a Turkish drop spindle. I thought that would probably more authentic than a spinning wheel or a traditional drop spindle with a round whorl.
Here is one of the links we found on how to make a Turkish drop spindle.
And here is a photo of the one that Sheepy and her dad made for me. It turns out that she didn't have one, but she thought it would be a nice gift for me! It is!


The great thing about the Turkish drop spindle is that when you fill your spindle, you pull out the shaft, then pull out the cross pieces, and you end up with a center pull ball.
I'd love to try some Andean plying when I get a full spindle. Sheepy said that it takes some special skill to keep the yarn bracelet from turning into a tangled mass. My thought is to learn the technique with commercial yarn first, and then try it with home spun.
Always more projects and more to learn! What a wonderful life I get to live!
Wednesday, November 17, 2010
Little Sister Wedding Dress
I volunteered to help my friend get ready for her daughter's wedding. She really needed help with the little sister dresses. I took on one dress project, my friend took on the other dress project.
Thankfully, they turned out better than the little girls had dreamed! They loved them!
The fabric and the ribbon were not friends! It took me many, many hours to sew this dress. I'm ashamed to admit that I have taken less time sewing prom dresses than this one took. I re-did the neckline at least five times. I could not get the ribbon to lay properly and look nice. In the end, it was acceptable, but if I had had more time, I would have taken it off and done it again!

I mistakenly thought that these were the wedding colors. Actually, the wedding colors were red, gold, and black.
The bride was stunning in her lace overlay dress, the mother of the bride was gorgeous in her gold suit and red shirt.
Everything was beautiful and the bride and the groom looked very, very happy! I was happy, too... that the yellow dress with pink trim was done!
Tuesday, November 16, 2010
Better Than Plastic
Saturday I spent a few hours cleaning out the front flower bed. Needless to say, it was full of weeds and dead leaves. I ran out of space in the garbage pail. Hubby would prefer that we throw some weeds away instead of putting them in the garden, and these weeds were not 'goat friendly'.
I was dreading the thought of shoving weeds into the big green plastic garbage bags. It doesn't matter what I do or what I put them in, they get holes and are difficult to move.
Hmmm.... We just brought in a load of grain and alfalfa pellets for the animals. Hubby and Vet2Be just filled all the 55 gallon drums and put the feed bags into the garbage.
I thought those empty feed bags would make much better bags to hold the weeds than the green plastic lawn and leaf bags.
The are!
I've been saving the brown paper Purina bags to put around the vegetable garden plants in the spring. We couldn't think of a good use for the IFA bags, but I think I'll be saving them for a while! They make a much better garbage bag for lawn and garden garbage than the plastic ones.
I was dreading the thought of shoving weeds into the big green plastic garbage bags. It doesn't matter what I do or what I put them in, they get holes and are difficult to move.
Hmmm.... We just brought in a load of grain and alfalfa pellets for the animals. Hubby and Vet2Be just filled all the 55 gallon drums and put the feed bags into the garbage.
I thought those empty feed bags would make much better bags to hold the weeds than the green plastic lawn and leaf bags.
The are!
 |
| They don't hold quite as much as the lawn and leaf bags, but they are soooo much sturdier that I can pack them really full! |
Monday, November 15, 2010
Milk Filter Snowflake
I was looking up how to cut snowflakes because I couldn't remember quite how to fold them. I have a friend who was never taught how to make them and I thought that it would be fun to show up at her door one day with paper and scissors and just sit and cut!
It occurred to me that I have milk filters, and those might work well for making snowflakes.
I have no idea how I put those milk filters and snowflakes together, but I did. Cross-wired brain, I guess!
I tried washing my milk filters a few months ago. I put them in the dishwasher with plastic clothes clips on them to hold them upright on the cup pegs on the top rack. I set the dishwasher for the sanitize cycle. I don't usually re-use them, but I was down to my last two and I wasn't sure when I was going to get to the farm supply store, so I thought I would give washing them a try. They came out clean and re-usable, and probably more sanitized than when they came out of the box!
Last night I decided to wash a few more, and see if they would work for snowflakes.
Yup! They do!
They were easier to cut than paper, which surprised me a little. I'm sure that they will do much better on the windows, too. Our windows tend to collect moisture, and the paper snowflakes get all gloopy. I am almost tempted to try dying them before I cut them with some blue sharpie markers and alcohol, just to see how pretty that might be!
I'll be washing milk filters all week to save enough for snowflakes! Then I'll stop by my friends with some scissors and re-cycled milk filters to teach her how to cut snowflakes.
Here's a video that shows how to use Sharpie markers and rubbing alcohol to dye.
I think small hobby farmers are always on the lookout for a way to re-use things that are normally disposable. I don't think we live especially 'green', but I am surprised at how many things we re-use compared to others we know.
It occurred to me that I have milk filters, and those might work well for making snowflakes.
I have no idea how I put those milk filters and snowflakes together, but I did. Cross-wired brain, I guess!
I tried washing my milk filters a few months ago. I put them in the dishwasher with plastic clothes clips on them to hold them upright on the cup pegs on the top rack. I set the dishwasher for the sanitize cycle. I don't usually re-use them, but I was down to my last two and I wasn't sure when I was going to get to the farm supply store, so I thought I would give washing them a try. They came out clean and re-usable, and probably more sanitized than when they came out of the box!
Last night I decided to wash a few more, and see if they would work for snowflakes.
Yup! They do!
 |
| Milk filter snowflake. |
 |
| Here's my opened box of milk filters. |
Here's a video that shows how to use Sharpie markers and rubbing alcohol to dye.
I think small hobby farmers are always on the lookout for a way to re-use things that are normally disposable. I don't think we live especially 'green', but I am surprised at how many things we re-use compared to others we know.
Saturday, November 13, 2010
Chevre
I made some more chevre last week. I really want to try making some homemade Velveeta. Here's the link for the recipe.
Instead, I just made the plain chevre again. I've been watching some of the cheesemaking and goat lists for ideas on what to flavor it with. Our favorite is onion, garlic, basil, and salt. Yum!
But here are a few other ideas:
Some sweet additives are:
I was also told that chevre freezes beautifully, so I have 4 containers in the freezer. I'll save them for the upcoming holidays!
Instead, I just made the plain chevre again. I've been watching some of the cheesemaking and goat lists for ideas on what to flavor it with. Our favorite is onion, garlic, basil, and salt. Yum!
But here are a few other ideas:
- chipolte pepper
- onion and herb
- garlic and herb
- bacon and ranch (I think they must use the powdered ranch dressing)
- jalapeno and bacon
- a few different McCormic spice blends--one was Roasted Garlic and Sweet Pepper
- others use some of the Weber (the grill people) spice blends
Some sweet additives are:
- powdered sugar then rolled in crushed Heath bars
- powdered sugar and chocolate chips rolled in nuts (I would use pecans, but I'm sure others would like walnuts)
- plain chevre with warmed cajeta poured over the top, served with graham crackers
- cinnamon and honey used as a breakfast spread on toast
I was also told that chevre freezes beautifully, so I have 4 containers in the freezer. I'll save them for the upcoming holidays!
Wednesday, November 3, 2010
Gouda Adventure
I went to a cheesemaking class on Saturday to learn how to make Gouda. Today is my first attempt at home. Well, I did it last Saturday, but it took me a while to get all the photos up!
I am using the recipe from Home Cheesemaking by Ricki Carroll with no adjustments. I always use a new recipe as directed. I'll often change things a little later, but for the first time I trust the recipe.
Step 1
Heat 2 gallons whole milk to 90˚F. Add 4 ounces mesophilic starter or 1 packet of mesophilic direct-set starter. Cover and allow the milk to ripen for 10 minutes.
I buy my supplies from New England Cheesemaking Supply company. There is a local cheese supply store, but they aren't open all the time. Many of their supplies come from New England Cheese Supply, so if she happens to be open when I need something, I buy from her. But usually it is much easier to purchase something online and have it shipped right to my door.
Step 2 and 3
I don't add calcium chloride because we use goat's milk, but that is step 2. After waiting for the starter to ripen for 10 minutes, add 1/2 teaspoon liquid rennet that has been diluted in 1/4 cup cool, unchlorinated water. I used to 'eye-ball' the water, but after reading the first few chapters in American Farmstead Cheese by Paul Kindstedt, I decided it was best to measure the water accurately. I didn't realize it would make a difference, but apparently it can!
Stir the rennet with an up-and-down motion for 1 minute. Cover and let the milk set at 90˚F for 1 hour.
At the class someone mentioned something about stirring the rennet and how long we had to stir it for. I noticed a few months ago that I could see the swirls of rennet (it has a very, very faint oily look to it) on the surface of the milk. I generally stir until that is no longer visible, usually 1-2 minutes. Then I know that the rennet is mixed in well. The oily swirl is very, very faint and I have to have a light on the milk in order to see it.
After about 40 minutes I set a pot on the stove to heat some water to close to boiling. I'll need some water that is 175˚F in Step 5 so I want to have it ready before I need it.
Step 4
Cut the curd into 1/2 inch cubes. I decided to cut the layers with my curd spoon first this time, instead of making the vertical cuts first. It seems to be just a bit easier and I ended up with fewer long curds. Let the curds sit for 10 minutes.
The next part is called 'washing the curd'.
Step 5
Drain off 1/3 of the whey. I wasn't really accurate about that. In the class she drained off enough whey so that the tops of the curds weren't under the whey. That looked like about 1/3, so that's what I'm doing.
Slowly add just enough 175˚F water to raise the temperature of the curd to 92˚F.
Step 6
Let the curd settle again for 10 minutes. Drain off the whey to the level of the curd.
Step 7
Once again, while stirring constantly, slowly add just enough 175˚ F water to bring the temperature of the curd to 100˚F. Keep the curd at 100˚F for 15 minutes, stiffing often to keep the curds from matting. It is kinda tricky to add water and stir at the same time! Try taking a picture, too.... oh wait! I don't have 3 hands!
Step 8
Allow the curds to set for 30 minutes. That's easy! I can vacuum a few rooms, or unload the dishwasher, or clean a bathroom! I try to clean house on the same day I make cheese because there are so many little bits of time that I need to wait for the milk to get to the next step.
At the cheesemaking class I learned how to see if the curd was ready. Put a few tablespoons of curd into the palm of your hand and squeeze it together. If it falls apart when you push on it with your finger, it's ready. If it still sticks together a bit and doesn't fall apart easily, give the curd another 5 minutes.
Step 9
Pour off the remaining whey.
Step 10
Quickly place the warm curds in a 2-pound cheese mold lined with cheesecloth, breaking them as little as possible. Press at 20 pounds of pressure for 20 minutes. This is a little different from farmhouse cheddar. Most hard cheeses that I've tried or read about say you have to press the curd when it is around 70˚F, not when it is warm.
Step 11
Remove the cheese from the mold and genly peel away the cheesecloth. Turn over the cheese, re-dress it, and press at 40 pounds of pressure for 20 minutes.
Step 12
Repeat the process but press at 50 pounds of pressure for 12-16 hours. Remove from the press.
Step 13
Make a saturated brine solution by combining the salt and water in a noncorrosive container. Soak the cheese in the brine for 12 hours. The teacher at the class said that the cheese floats, so sprinkle salt on top of the cheese, too. Here is how I made my brine, the link goes to New England Cheesemaking Supply Company's website where they have a page on how to make a brine and how to brine cheese.
This is the first cheese that I've put in a brine solution. All the other hard cheeses I've made have you adding the salt to the curd, Gouda doesn't. The salt is soaked into the cheese from the brine solution.
Step 14
(Sheesh! There's a lot of steps to this cheese!)
Remove the cheese from the brine and pat dry. Air-dry the cheese at 50˚F for 3 weeks. I don't have a dry spot that is 50˚F--especially not for 3 weeks! The teacher at the class said to air-dry it on the counter. That will have to do for now. I just don't have a spot like that right now.
The teacher at the class also said to turn the cheese 4-5 times a day for the first week. Then two or three times a day for the next two weeks.
The next two steps.... even though I haven't gotten that far yet....
Step 15
Wax the cheese. Hmmmm..... do I wax or seal it in the Food Saver? I've still got a few weeks to decide, so no hurry on that!
Step 16
Age it at 50˚F for 3-4 months, turning it 3 or 4 times a week.
I am using the recipe from Home Cheesemaking by Ricki Carroll with no adjustments. I always use a new recipe as directed. I'll often change things a little later, but for the first time I trust the recipe.
Step 1
Heat 2 gallons whole milk to 90˚F. Add 4 ounces mesophilic starter or 1 packet of mesophilic direct-set starter. Cover and allow the milk to ripen for 10 minutes.
I buy my supplies from New England Cheesemaking Supply company. There is a local cheese supply store, but they aren't open all the time. Many of their supplies come from New England Cheese Supply, so if she happens to be open when I need something, I buy from her. But usually it is much easier to purchase something online and have it shipped right to my door.
Step 2 and 3
I don't add calcium chloride because we use goat's milk, but that is step 2. After waiting for the starter to ripen for 10 minutes, add 1/2 teaspoon liquid rennet that has been diluted in 1/4 cup cool, unchlorinated water. I used to 'eye-ball' the water, but after reading the first few chapters in American Farmstead Cheese by Paul Kindstedt, I decided it was best to measure the water accurately. I didn't realize it would make a difference, but apparently it can!
Stir the rennet with an up-and-down motion for 1 minute. Cover and let the milk set at 90˚F for 1 hour.
 |
| Clean break--it's ready to cut into cubes. |
After about 40 minutes I set a pot on the stove to heat some water to close to boiling. I'll need some water that is 175˚F in Step 5 so I want to have it ready before I need it.
Step 4
Cut the curd into 1/2 inch cubes. I decided to cut the layers with my curd spoon first this time, instead of making the vertical cuts first. It seems to be just a bit easier and I ended up with fewer long curds. Let the curds sit for 10 minutes.
 |
| Right after cutting. First I make the vertical cuts with a cheese knife. |
 |
| Next I use my curd spoon to make the horizontal cuts. |
The next part is called 'washing the curd'.
Step 5
Drain off 1/3 of the whey. I wasn't really accurate about that. In the class she drained off enough whey so that the tops of the curds weren't under the whey. That looked like about 1/3, so that's what I'm doing.
 |
| Pour the whey into a colander lined with a cloth to catch any curds that might slip through. Then put the curds back into the pot. No sense wasting perfectly good curds! |
Slowly add just enough 175˚F water to raise the temperature of the curd to 92˚F.
 |
| 175˚F water ready to put into the curds and whey. Just add 3/4 cup at a time. I added 1 1/2 cups at first and the temperature was a little high (see the next photo). |
 |
| Woops! A little too much hot water so the temperature went a little too high. |
Let the curd settle again for 10 minutes. Drain off the whey to the level of the curd.
 |
| The curds are beginning to shrink at this point. |
Step 7
Once again, while stirring constantly, slowly add just enough 175˚ F water to bring the temperature of the curd to 100˚F. Keep the curd at 100˚F for 15 minutes, stiffing often to keep the curds from matting. It is kinda tricky to add water and stir at the same time! Try taking a picture, too.... oh wait! I don't have 3 hands!
Step 8
Allow the curds to set for 30 minutes. That's easy! I can vacuum a few rooms, or unload the dishwasher, or clean a bathroom! I try to clean house on the same day I make cheese because there are so many little bits of time that I need to wait for the milk to get to the next step.
At the cheesemaking class I learned how to see if the curd was ready. Put a few tablespoons of curd into the palm of your hand and squeeze it together. If it falls apart when you push on it with your finger, it's ready. If it still sticks together a bit and doesn't fall apart easily, give the curd another 5 minutes.
 |
| Test 1: Some curd from the pot.... |
 |
| Squeeze..... |
 |
| Here's what it looks like right after I squeezed the whey out. |
 |
| Push it apart with your fingers. If it doesn't break apart into individual curds, it isn't ready. This curd isn't ready yet. |
 |
| Curd test 2: Squeeze the whey out of the curds.... |
 |
| Push the curds apart with your fingers--these curds came apart fairly easily, just like in the class. I had to leave the curds for an additional 10 minutes to get them to this point. |
Pour off the remaining whey.
Step 10
Quickly place the warm curds in a 2-pound cheese mold lined with cheesecloth, breaking them as little as possible. Press at 20 pounds of pressure for 20 minutes. This is a little different from farmhouse cheddar. Most hard cheeses that I've tried or read about say you have to press the curd when it is around 70˚F, not when it is warm.
 |
| My hokey-pokey cheese press with all the weights on top! I like the flat weights better than the hand weights, but I don't have enough flat ones yet... still looking at the thrift store and yard sales! |
Remove the cheese from the mold and genly peel away the cheesecloth. Turn over the cheese, re-dress it, and press at 40 pounds of pressure for 20 minutes.
Step 12
Repeat the process but press at 50 pounds of pressure for 12-16 hours. Remove from the press.
Step 13
Make a saturated brine solution by combining the salt and water in a noncorrosive container. Soak the cheese in the brine for 12 hours. The teacher at the class said that the cheese floats, so sprinkle salt on top of the cheese, too. Here is how I made my brine, the link goes to New England Cheesemaking Supply Company's website where they have a page on how to make a brine and how to brine cheese.
 |
| Brine solution. |
 |
| The first test (strip on the bottom) wasn't acidic enough so I added 1/4 teaspoon of citric acid. That brought it right up into the correct pH range (strip on the left). |
This is the first cheese that I've put in a brine solution. All the other hard cheeses I've made have you adding the salt to the curd, Gouda doesn't. The salt is soaked into the cheese from the brine solution.
 |
| Soaking overnight in the brine solution. I left it out on the patio because the weather is cool and that saves me from moving tons of stuff around the fridge. |
Step 14
(Sheesh! There's a lot of steps to this cheese!)
Remove the cheese from the brine and pat dry. Air-dry the cheese at 50˚F for 3 weeks. I don't have a dry spot that is 50˚F--especially not for 3 weeks! The teacher at the class said to air-dry it on the counter. That will have to do for now. I just don't have a spot like that right now.
The teacher at the class also said to turn the cheese 4-5 times a day for the first week. Then two or three times a day for the next two weeks.
The next two steps.... even though I haven't gotten that far yet....
Step 15
Wax the cheese. Hmmmm..... do I wax or seal it in the Food Saver? I've still got a few weeks to decide, so no hurry on that!
Step 16
Age it at 50˚F for 3-4 months, turning it 3 or 4 times a week.
Saturday, October 30, 2010
Book Review: American Farmstead Cheese
Wow! I have only finished the first few chapters of this book and I have learned so much about cheesemaking! If you are interested in the why and how of cheesemaking, not just recipes, this is a wonderful book.

Since Hubby has a Ph.D. in Synthetic Organic Chemistry, there are often chemistry words floating in the air at our house. Sometimes there are chemistry experiments sitting on the kitchen counter. Sometimes the kids have accidentally eaten some of Hubby's chemistry experiments that were sitting on the counter (nothing that would harm them, don't worry!) Two of our children are studying biochemistry at the University.
Although I am not a chemist, I am familiar with the jargon because of the house I live in, so the first few chapters weren't difficult to understand. I suppose if you have a really hard time with chemistry, then you might have some trouble. But I doubt it, the author does a great job explaining the chemistry of milk and how it affects cheesemaking.
Wonder why your cheese turns out differently in the fall than the batches you made in the spring? It's the fat to casein ratio and the mineral content.
Last week I was wondering why I needed more salt in my Feta this time of year. There is more fat in the milk in the fall!
Lots and lots of information. I haven't taken any cheesemaking courses, although one is offered at a University close by. I think I saved myself a pile of money by purchasing this book instead of taking a class.
I am thoroughly enjoying this book and can tell this is one that will be on my reference shelf!
Friday, October 29, 2010
Fresnel Lens Cooker
Sheepy's Dad is making some Fresnel lens cookers! Sheepy and her family have been collecting old projection TVs with plastic lenses on the front. Sheepy's dad builds the frames.
Taco showed us one last week. It started a piece of bark on fire in less than 3 seconds.
They look like they are so much fun! Hopefully, we'll get to see one in action soon.
If I ever get one, I'll have to make a cover for it. Taco made sure to cover theirs when it was sitting in the car. It wouldn't be a good thing for the car to start on fire, or anything
I wonder if there is a safe way to use one of these to heat the animal's water in the winter, or at least thaw it out once a day.
Dehydrated Tomatoes: Update
I've lost count of how many bushels of tomatoes I've dehydrated! There have been alot!
I wanted to write down some of the things I've learned work best so that when I start this project again next year, I'll have a good reference.
I wanted to write down some of the things I've learned work best so that when I start this project again next year, I'll have a good reference.
- The tomatoes in cardboard boxes lasted longer than tomatoes gathered and stored in plastic buckets, even longer than the ones in the plastic buckets with drainage holes in the bottom.
- Lay an old towel down on the counter. It will save clean up time, and save you from slipping on the juice that might drip onto the floor.
- Spray the trays with some sort of non-stick coating. I only had to do that once, and the tomatoes didn't stick again.
- Wear gloves! I didn't wear gloves on the first batch and my hands were sore the next day from the acid in the tomatoes.
- Slice at least 1/4" thick. I can dry more tomatoes that way, and they don't stick to the tray, especially when using the non-stick spray.
- If the tomatoes are a little soft, make sure you sprinkle them with non-iodized salt. Mine don't seem to turn black that way, and they have a nicer color if they have been sprinkled with salt.
- However, sprinkling salt on the tomatoes will make the tomatoes drain juice a little faster, so make sure the tomatoes are done dripping before you put them on the dehydrator.
- We some of the tomatoes dried with basil, onion granules, and salt. The ones that had marjoram as well, didn't impress me as any better tasting than the ones without. It's nice to have them pre-seasoned, so I'll always put salt and/or other seasonings on before drying.
- 1 ounce of dried tomatoes = 1/4 cup of tomato powder. Sometimes I want to use crushed or whole tomatoes from a can, if I can weigh out the tomatoes, then I can use my conversion table easily. I found the conversion tables here at Diane Hopkins blog under the title: Power-Packed Nutrition: V8 Powder.
- Run a fan near the dehydrators. It tends to move the moist air away from the dehydrator and the tomatoes dry faster. The dehydrator also puts out a fair amount of heat, so if the weather is nice outside, you can put the fan in the window and set it to the exhaust setting. If the weather is cold, then the fan seems to move the air throughout the house better than just letting the dehydrator sit in the room and work.
- The dehydrator is noisy! Put it in a room where it won't bother anyone.
Thursday, October 28, 2010
Oregon Trail Quilt: Extra Blocks
I generally like bigger quilts. If a quilt doesn't turn out queen-sized, then I add blocks or change the setting so I end up with a big quilt. It seems to me after all that work I should have something I can use, not hang on the wall!
The following blocks are the blocks I added to my quilt. The next step is to sew everything together and take it to the quilter to quilt. As much as I like a hand quilted quilt, they have to be treated so carefully that I don't finish my quilts like that. If they are machine quilted I can wash them in my front loading washing machine, and we can use them on the beds!
I went through the patterns from a few years ago when we also made 6" blocks and chose some that I thought would fit in an Oregon Trail quilt. I also found a few blocks on the internet to add.
All these blocks look like lots of work, just remember that it took me a year to sew all the blocks in my Oregon Trail quilt. I still haven't put all the blocks together. It just took me a long time to get all the photos and then post everything. Most months I only made the four blocks required for the class. There were a few months when I made a second set of four blocks so that my quilt would be bigger.
North Wind is another block that I paper pieced. Here is the pattern I drafted. The directions above show a much easier way to make the block, but I really wanted to have the corner triangles solid, and the only way to do that accurately is to paper piece the pattern.
I rough cut the pieces for North Wind before I paper pieced it. It makes for a much more accurate and faster block than the cut-as-you-go method that I've used before.
That's all the blocks, except for the filler blocks that will go between the pattern blocks. As soon as I get my other projects to a point where I can sit and sew, I'll sew up the top and post a photo of that, too.
The following blocks are the blocks I added to my quilt. The next step is to sew everything together and take it to the quilter to quilt. As much as I like a hand quilted quilt, they have to be treated so carefully that I don't finish my quilts like that. If they are machine quilted I can wash them in my front loading washing machine, and we can use them on the beds!
I went through the patterns from a few years ago when we also made 6" blocks and chose some that I thought would fit in an Oregon Trail quilt. I also found a few blocks on the internet to add.
All these blocks look like lots of work, just remember that it took me a year to sew all the blocks in my Oregon Trail quilt. I still haven't put all the blocks together. It just took me a long time to get all the photos and then post everything. Most months I only made the four blocks required for the class. There were a few months when I made a second set of four blocks so that my quilt would be bigger.
 |
| Tumbling Leaves. This is a directional block, it looks a little different depending on how you set them into the quilt. |
 |
| You should be able to click on the image above and then right-click and save as to your computer. |
 |
| Monkey Wrench. |
 |
| You should be able to click on the image above and then right-click and save as to your computer. |
 |
| Sawtooth Star |
 |
| You should be able to click on the image above and then right-click and save as to your computer. |
 |
| Joshua's Ladder, another directional block. I haven't decided how I am going to put this one together yet, but it will probably be this way. |
 |
| You should be able to click on the image above and then right-click and save as to your computer. |
 |
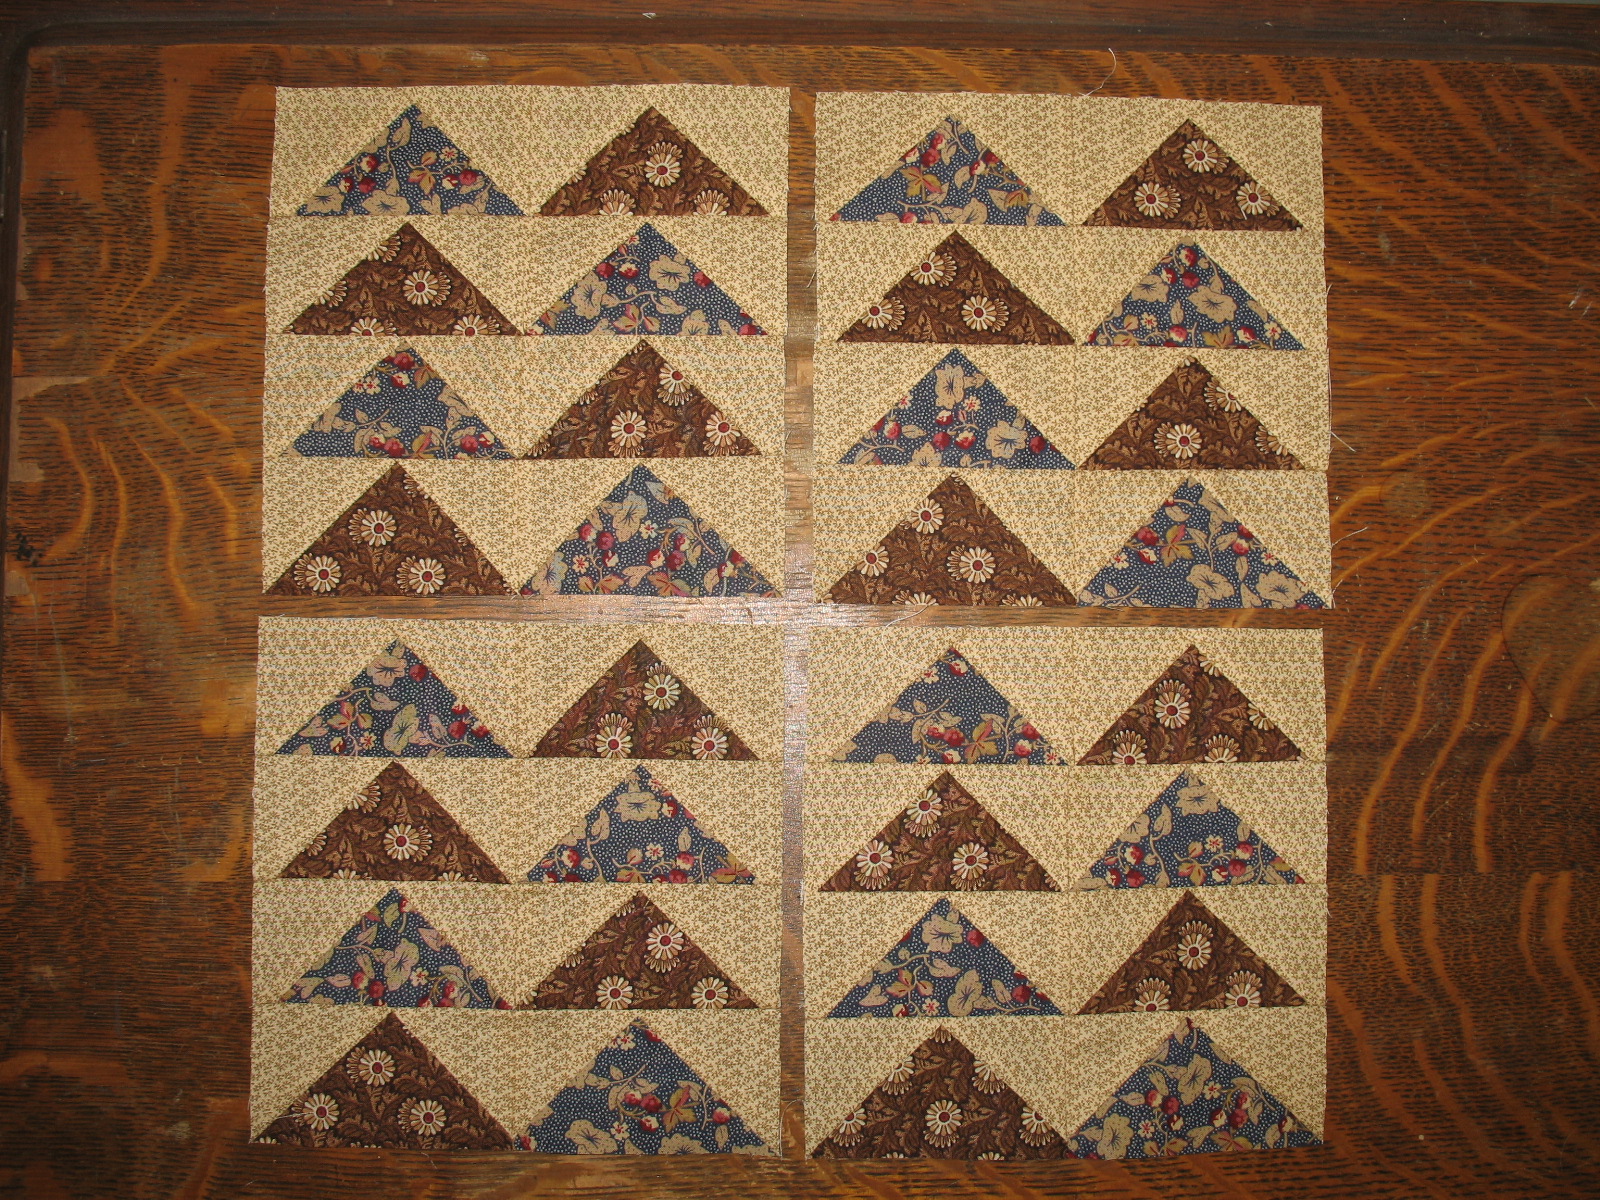
| Flying Geese |
 |
| You should be able to click on the image above and then right-click and save as to your computer. |
 |
| North Wind, another directional block, sort of. I can't really imagine it being put together any other way. |
 |
| You should be able to click on the image above and then right-click and save as to your computer. |
 |
| You should be able to click on the image above and then right-click and save as to your computer. |
That's all the blocks, except for the filler blocks that will go between the pattern blocks. As soon as I get my other projects to a point where I can sit and sew, I'll sew up the top and post a photo of that, too.
Subscribe to:
Posts (Atom)