Tuesday, April 7, 2020

Making a Fitted Mask (For My Friends) No Filter Pocket


I've been using the Craft Passion Mask pattern. It seems to fit better than the Olson mask pattern. You might want to try both, just to see how each works for you. I've also used the Canyonlands Quilt pattern. It has more pleats and takes more work. Thats the one in the photo above. He also has a mask made with the Craft Passion pattern.

I like the fitted style better than the pleated style because I think they offer better coverage, and I can put stabilizer in between the layers. The pleated style doesn't give me the option of an added stabilizer layer.

There are links at the end of the post to some YouTube videos that I found very helpful. There is a lot of information in them about what materials to use, and why they use them.

There are links in my post that go to products I use. I do not receive any money or commission if you click on them. You might be able to find things locally that will fit your needs.

This blog is not monitized. I don't make any money when you visit. You won't find advertisements popping up while you're trying to read instructions.

You're welcome.

Fabric and Supplies
100% cotton pre-washed fabric. If you have batik, use that because it has a tighter weave.

Wire for the nose piece. Some people are using a long pipe cleaner twisted double so that it's 2 pipe cleaners thick. It's soft and comfortable, but we don't know how long it will hold up in the wash.
I'm using copper wire because it should be durable when being washed.
I'm using a smaller gauge than recommended in the video below because it is easier to bend and is more comfortable on my nose. It also gives a good seal.
Sewing Machine. I have a serger so some of my seams are serged because it's faster.

Pins

Elmer's Washable School glue (optional)

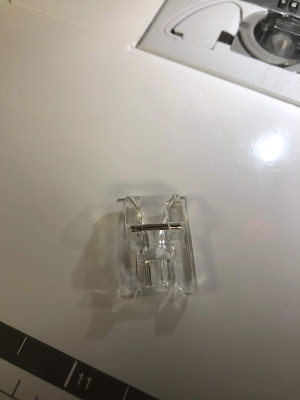
Plastic beading foot or zipper foot to sew the wire in place.

Sorry for the farmer hands. I live on a farm, so it's to be expected.
This is the beading foot I use.

Top view.
You might have one in your accessory case.
I've seen some made out of metal, too.
Yours may look slightly different.

Some sort of non-woven interfacing. I'm using a medium weight cut away non-woven embroidery stabilizer from World Weidner. The videos below also offer other suggestions.

Cutting

Cut two pieces of the Pocket Main Fabric
Two pieces of Pocket Lining Fabric
Two pieces of non-woven stabilizer or interfacing using the Pocket Lining Fabric
Sewing

Place Main Fabric pieces right sides together.
Place a piece of stabilizer interfacing on either side.
Stitch the curved seam (center front seam)


Sew or serge center front seam of Main Fabric pieces
AND Lining Fabric Stabilizer/Interfacing pieces.
That's 4 layers sewn together.

Serge or sew the center front seam of the Lining Fabric


Pin the lining fabric to the main fabric along the top (curved) raw edges....


matching the center seams.

The lining fabric and the stabilizer/interfacing layers will line up and
are shorter than the Front Main Fabric.
The Front Main Fabric piece will be in 'sandwiched' in the middle.


Sew or serge the top edge.
Yeah... I know. It wasn't a great job because I was trying to video 
and serge at the same time.
And then the video didn't turn out. 


Press the seam with wrong sides together.
I hit the center seam at the curve with a hammer to flatten it out.
(Use some scrap fabric to cover the bulky spot when you hit it with a hammer. I
t will keep the hammer from marking up the fabric.)
The center seam is a bit bulky and I like to sew my wire in.
Hammering the spot flattens out the bulk. 

The center seam by the nose flattens out nicely.


I put the 5 1/2" piece of wire with pinched ends inside the seam.
I use the same size wire for all masks.
The video shows a 6" piece of wire. That might work better for you.
The 5 1/2" piece works best for me.


I pin the wire inside the seam and mark both ends of the wire with a heat erase pen.


 You can mark it with whatever you have available. I like to know where the ends of my wire are so that I don't sew over them causing my needle to break. I use a Frixion pen.


The wire is snuggly sewn into the nose area at the top of the mask.


Turn the mask so that right sides are together and pin bottom edge.


Yes, the front of the mask is longer than the back and the interfacing/stabilizer.
It helps reduce the bulk along the cheeks when you turn it under.


Sew along the bottom seam.
Turn the tube right side out.


If the center bottom seam is bulky, feel free to hammer that to flatten it out.
You'll be top stitching over the bottom to keep the layers in place.


I've been using Goody Hair Elastics cut along the seam.
If you are using flat 1/4" elastic there is no need to put a knot in the ends.
You may have to try different lengths of elastic.
I find 5 1/2" - 6 1/2" work.

Turn under the longer raw edge.


Fold the raw edge under it's encased in the seam.
I glue my seams with Elmer's Washable School glue because sometimes that works better than pins.
Either the white glue or the clear glue seem to work fine.
It washes out after 1 washing so it isn't a problem.

I always recommend people wash masks before they use them for the first time.


If you would rather pin than glue, this is how I pin the casing.


Sew along the ends where the elastic is to hold them in place. My video failed so you'll have to work with written directions.
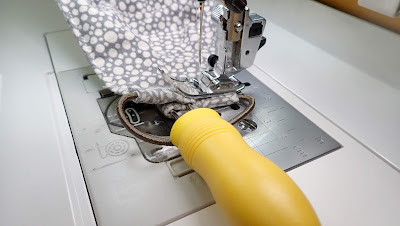

I like a pleat along each side because I think the mask fits better.
Lots of people are using a corn holder to make the pleat.
Don't sew over the prongs, just use it to fold and make the pleat.


Make sure you pleat the opposite direction when you get to the other side so
both the pleats are facing the same direction on the front.


Topstitch down one side, across the bottom, and up the other side.
I don't topstitch along the top edge because the casing and wire hold the layers in place.
This is a child's mask on an adult Styrofoam head.
The strap was 3D printed to relieve the elastic pressure on the backs of ears
for people that need to wear the mask for long periods of time


You can find the file here. It was created by a young scout named Quinn. We tried a few different styles, this one works best for us.


This is my grandson's mask before I started pleating the sides.
It's just a little bit big.
I also extended the sides a little on his mask so it is slightly
wider (ear to ear) than the one in the instructions.


I added pleats later, and the mask fits much better. 


These are the best videos I've found and used.


Thanks for reading!

Stay safe, stay healthy, stay hopeful!

I'm heading out to the barn to do the evening chores. If you have questions, please leave them in the comments and I'll be happy to answer them.


Friday, April 3, 2020

Should YOU Get Chickens?

Should you get chickens? Right now? In the middle of a pandemic?

Ask yourself some questions first.

Why do you want chickens? What is your goal with chickens?

Are you doing it so you and your children can learn about chickens, so you can learn about the effort that goes into taking care of chickens? Then yes, get chicks.

Are you getting chickens because you are panicked and think chickens will provide eggs for you? No, don't get chicks or chickens.

Are you getting chickens to learn about resilience, determination, and never giving up hope, even when your chickens get sick? Even if a neighbor dog gets in and kills some? Even if a raccoon gets into the coop?

What will you do with your chickens when they are old and no longer laying?

If you want chickens, and are ready for the work that goes with them, then here are a few thoughts that I have.


Most people want to get chicks. That's a great idea! They are cute and fuzzy! They are also fragile.

Chicks or Chickens?


Here's a post I did last year about our new chicks.

I like watching chicks grow into chickens. You'll need a place to keep them warm for 4-6 weeks. If they are inside, be aware that they smell and they make a mess. You'll have to clean their brooder every day. Are you up for that?


Chicks need a heat source for about 4- 6 weeks depending on the weather. My favorite is the Brinsea Heater  because there is no danger of fire. I sometimes use a heat lamp, but I have to be very, very careful with those because if they fall on to the bedding, there is a good chance of starting a fire.

Once the chicks are feathered out, they can live outside.

Which breeds? That's 100% up to you! I tend to like the more docile birds that. They don't lay as many eggs (4-6 per week) rather than the high layers (5-6 eggs per week) because I like their calm nature. I don't like Leghorns because they are very excitable and not as tame. It's also very difficult to keep them in the yard, even if you clip the feathers on their wings.

Chickens need about 14 hours of sunlight per day to produce eggs. Once fall hits, their egg production goes down.

If your chickens go broody and want to sit on a clutch of eggs, they stop laying eggs. Their egg production stops when they molt, too. They will loose their summer feathers and grow new feathers for winter. You'll still be feeding and taking care of them the entire time! Are you ready for that?

How much space do chickens need?
Ours are free range, meaning they are not locked inside a coop or a pen. Their coop is inside a pen, but they can get out of the fence easily through a hole. Chickens love to eat bugs, and I love that about them!

However, they will scratch through your flower beds and vegetable gardens to get those bugs. We live on enough property that my chickens have plenty of space in the pasture to roam. If I see them in the flower beds, then I know they have run out of food and bugs in the pasture area.

The general recommendation for chickens is that you'll need 4-6 square feet of space per chicken for roaming around. We like to have more than that. We feel it's better to have around 15 square feet per chicken in their pen. If you have 6 chickens, you'll need about 90 square feet. Think about it this way: a pen that is 6' wide by 15' long will give 6 chickens plenty of room to roam.


That doesn't include space for the coop!

You can see that our coop is an old wire cage that protects the chickens while they are sleeping. It's not fancy. Chickens don't need fancy.

Inside is a bit of a mess right now.
I use cardboard boxes from Costco for them to lay in.
I throw them away once they are really nasty.

I also keep food inside the coop so they have access to
food when they are locked into their coop at night.

Coop Set Up
Chickens need a place to get out of the wind and weather. They also need a place to get out of the sun in the summer. Our coop is on the north side of the barn. It isn't ideal, but we have a shade cloth and pieces of wood to give them protection from the wind and snow in the winter.

Keep the chicken's food and water away from where they roost at night. It makes a mess if their droppings are in their food and water. It isn't healthy for them, either.
We have both a tank waterer, and a rubber bucket of water.
Both need to be cleaned regularly.
The metal tank waterer seems to last longer than any of the plastic ones we have had.
You'll also need a heater for it if you keep chickens through the winter.
You don't have to have electricity to your coop. But it really helps! We use it for light at night, and we need it to have a water heater in the winter. Chickens will eat snow, but we think it's best for them to have liquid water all year long.

If you want to contain your chickens, you'll need a 6' fence to keep them in. You might need to have a cover over the top of the run to keep hawks and other predators out.

The more space you have for your chickens to roam, the less you will have to deal with their droppings. We do a major clean every spring and fall. Spring cleaning always takes more time that fall cleaning because the chickens don't wander around the pasture as much when we have snow on the ground.

The chickens like the cardboard boxes for laying eggs,
and they also like their wooden nesting box.

I keep golf balls inside the nesting boxes because it tricks the chickens into thinking someone else laid an egg inside. If another chicken thinks it's safe to lay an egg, then the hen looking for a place to lay will often want to lay in the same spot.

How long before my chicks lay eggs?
That depends on the breed.

Some hens will lay as early as 16 weeks (4 months!). But they don't live as long and they don't lay for as many years as some of the later laying breeds. Some breeds will start laying around 20-24 weeks old.

I personally like the Light Brahmas. They are docile, friendly, lay a good amount of brown eggs, and don't mind Utah winters.

We also like the Black Sex-Link (or any sex-link) birds. They also seem to do well through our cold winters.

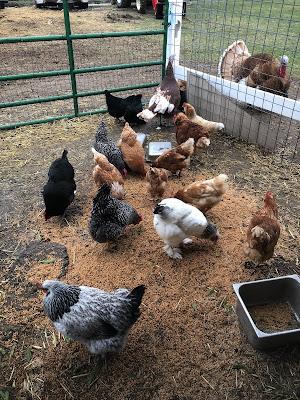
We have a few different breeds of chickens.
While I love the Brahmas, we are often given chickens because
families get chicks, raise them, and then decide they
really don't want to deal with all the day to day work.

I like my chickens. I love having eggs. We've had chickens for about 15 years. We've learned a lot! We've had sick birds that we nursed back to health. We've had predators. We've had sweet, gentle chickens that are just like pets. They follow me around the barn yard and don't mind being picked up.

Like dogs or cats, they will need time, money, and equipment to produce eggs. They will need to be cleaned up after. They will need food and water whether they are laying or not, whether you are out of town or home.


Hopefully that gives you a little more information about chicks and chickens to help you decide if chickens are right for you.


Friday, March 27, 2020

Shelter and Food on the Farm

Last week someone asked if 'farm stays warm for the animals?'

The animals have shelter in the barn. They are out of the wind, rain, and snow. I wouldn't be warm in the barn, but the animals are!

They have winter coats, and their bodies are different than ours are. They have a different stomach than we do. Their stomach produces heat when they are digesting (breaking down) their food. It's so interesting how we are different from animals!

As long as our animals have a place to get out of the wind, rain, and snow, and they have plenty to eat and drink, they stay warm. 

Our barn is just right for our animals.
It provides shelter to keep them warm and dry.


Do you see the little dog house inside the goat's stall?
The baby goats sleep inside so they stay very warm.
I lock the goats inside the stall at night when we have goat kids that are less than 1 month old. Kids are funny and run around. But I don't want them to run around outside at night when it's cold. They aren't old enough for that quite yet on my farm. I think my goats are spoiled, but that's ok. They grow into big beautiful goats and I like that!

Tia and Mia, the baby goats, are the first ones to get fed in the morning. They are so hungry!


The baby goats love to run and play outside, just like children do! They have recess all day, unless they want a nap inside the little dog house.


Baby goats are called kids.
They are so funny and jump on all sorts of things.

They follow me around where ever I go.
They love to jump into the chicken coop as soon as the chickens come out in the morning.
Sometimes kids do silly things.
Tia got stuck on the wagon one day.
Good thing I was right there to get her unstuck!
Do you ever do silly things like that?

We have sweaters on our baby goats for about 2 weeks. When they are about 2 weeks old they are a little smarter and make sure they stay close to their mom, and know how to find their way back to the little dog house for a nap.


My grandsons are home from school. They spent a day with me this week while their mom and dad went to work. They love the baby goats!

No, baby goats don't bite noses. They are babies, and like all babies, they put everything in their mouth to help them figure out more about it.

This is what the chickens sleep in at night.
It's out of the wind, rain, and snow.
They stay very warm inside all night long!
Sometimes a few of the older hens stay inside for a few hours instead of going outside. The sun has been out the last few days, so once I open the door, they all come running out.

*     *     *     *     *
Everyone is storing a little bit of extra food just in case we are asked to stay home. We have a little bit of extra food at home, too!

We were running low on food for the animals because it's the end of winter. Most farmers have enough to last their animals through the winter and into early spring when the pastures start to grow. They usually have enough to last through June when the hay is cut the first time.

Farmers and ranchers are always thinking about what needs to be done now, and next week, and 6 months from now, and next year. We always have to plan ahead.

One of the wonderful things about our neighbors is that they know we have chickens, goats, and cows. We have turkeys and ducks and a sheep, too!

They know that when food isn't good enough for people, it is often still good for animals. Instead of throwing the food into the dump, they bring it to us.


That is a lot of old food storage that our animals will eat! They think it's treats. Shhhhh..... don't tell them it isn't.

Do you know what the goats favorite treats are? Old noodles! They love the way they crunch in their mouth when they are eating them!

The chickens love old wheat!


We also stocked up on hay cubes and hay pellets for the animals since we are starting to run a little low on hay.

Look at those big bags! We had to unload them with the tractor!


*     *     *     *     *

Are you getting ready to plant a garden? Watching something grow can be a lot of fun! Here's a post a did about 8 years ago on growing plants in soda bottles. You might think that's a fun and interesting thing to do right now. 


Are you working on writing while you're at home, too? You might like to write an essay and enter it into Provo's America's Freedom Festival. They have prizes!

If you're interested, you can find more information at this link.
Also note that the deadlines for both the essay and art contests have been extended until may 18, 2020. You still have plenty of time to work on them!

*     *     *     *     *

Thanks so much for the comments and question last week!

I love your questions. It helps me to know what things you want to learn about on the farm!

Make it the best week you can!