Showing posts with label crafts. Show all posts

Tuesday, August 21, 2012

Not Much Farmin'

I've been busy this summer helping around the neighborhood and working on some other projects. Not much farming or cheesemaking going on right now!

A set of 36 color cubes. Each cube has four solid colored sides (red, yellow, blue, white) and two dual colored sides (red and white, yellow and blue.) I've been wanting one of these since I saw a set here.


This table needed a new leg. I used my Kreg Jig Jr to build it. It's the second project with the new jig and I'm excited to have more projects in mind!


These are some temporary shelf doors that cover some of the open shelves in my daughter's 3rd grade classroom. She needed something to hide the stuff that has to be stored there. These were easy to 'build', the cost was minimal, and although they don't completely cover the shelf, they make a big difference in calming the room down.

I'll be posting a tutorial for the teachers at her school who want to make some of these. The teachers at this school are phenomenal! The administration.... not so much!

Saturday, April 16, 2011

Dyeing Eggs with Silk Ties

I've seen this process a few times around on the internet. Skip To My Lou has a great tutorial with beautiful photos.

While I was looking for ties at the thrift store ($2 each) there was another mom with her daughter looking at ties, too. Her daughter was about 5 years old and kept asking, "This one feels nice. Is this the right fabric?" I asked the mom, "Are you going to dye eggs with silk ties, too?" "Yes." I always think it's great when I meet up with other people who are trying crazy things like me!

I invited my friend, CooleyBug, over to experiment with me. I thought that would be a great idea since she is the one that kinda got the 'blowing out eggs' thing started. We had a really nice time!

Here's the process we used and the things we figured out as we went along and looked back at what we had done. If you want to see how we blow out eggs, you can see how we do it here.

We started with blown out duck eggs. There are some blown out chicken eggs in the bowl, too, but we wanted to use duck eggs since they are much sturdier.
Old silk ties (they must be 100% silk or the dye won't transfer). We took them apart at the seams and only used the silk parts (I tucked the interfacing away in my box just in case I need tie interfacing sometime in the future).
We found that if we wet the silk before wrapping it around the egg, the silk was much easier to handle. This piece of silk was from the lining of one of the ties!
Sometimes the tie fabric was fairly thick and had to be folded and twisted on one side.

Sometimes the fabric was nice and thin and we could roll the egg in the fabric and twist the ends like a little candy.
Then we tied up the silk wrapped egg in an old rag. We decided later that we would have had better results if the rags had been cut on the bias so they would wrap around the egg more snugly.
We filled the pot with water and added 1/4 cup of white vinegar. Since the eggs were blown (hollow) we knew they wouldn't stay under the water. I added the cake cooling rack which happens to fit inside my pot.
Here's where it gets a bit wacky.... the cooling rack wasn't heavy enough so we added the colander upside down over the top.....
Then rested a pot on top of that. It worked.  I realized later that I could have used the flat weights I use for the cheese press on top of the cooling rack, too. We simmered the eggs for 30 minutes.
I put the eggs into a basket and let them drain and cool in the sink. Remember, these eggs were hollow so they filled with hot water while we were simmering them.
We unwrapped the rags and this is what we saw.
After taking off the silk ties, this is what the eggs look like. You can see the silk wrapping under the eggs.
I found one tie with Micky Mouse on it! It turned out really cute! CooleyBug took that one home because I thought her kids would really appreciate it.
One of my favorites. This was the lining of one of the ties. After we unwrapped them we had to use the same process we used for cleaning out the eggs--basically pushing air into the egg through the hole in the bottom to gently force the water out.
This is my half of the eggs put back in the bowl.
One of the things we tried was using both sides of one of the ties. You can see the two eggs with diamond shapes on them in the bowl. The darker one was the inside of the tie, the lighter one was the outside of the tie.

We learned that the tie has to be touching the egg or the dye doesn't transfer. Next time we will be sure to use rags cut on the bias. You can see a few eggs that don't have a complete transfer. 


It was really fun working with CooleyBug! She has two young daughters that came and played while we played. CooleyBug told her daughters that moms need play-dates, too! Sounds like a great idea to me!

Thursday, April 7, 2011

A Nest for Mama Bird

My sister was in our state yesterday. I haven't seen her for two years! Not since my mother's funeral.

I wanted to send a little something home with her for my niece and nephew and I have been itching to be 'creative' again.

I made a little nest last week and gave it to the CooleyBug's youngest daughter. It was so much fun! I've never felted anything on purpose or needle felted anything. I ran across a blog post called, "Edds for Mama robin bird!"

Sheepy gave me some felting needles a few years ago and I hadn't ever used them. I admit I was nervous, and not sure I could really felt with a needle. I have plenty of wool roving around, and some wool yarn that is perfect for felting. Instead of hand knitting the nest and square for the bunny, I did both of those parts on the knitting machine.

All I did was follow the directions.... this is what my second try looks like.  I decided I would get a photo of it before I gave it away, too!

The nest and eggs are just the right size for her 18" doll.

And are some photos of a little bunny I made for my nephew. I found the directions at Jo So and Sew. She has a wonderful tutorial. This is my first bunny and I don't think it turned out as cute as her tutorial, but I am sure I will try it again.

I needle felted his tail (my favorite part of the bunny!) as well as his eyes and nose. I felted the whole bunny, too, by putting him in the washer.

The next time I will do a better job making his little nose more of a triangle. This was my first time needle felting a tiny piece of roving onto a knitted piece of cloth.

The tail is the cutest part! I needle felted a ball, then I needle felted the ball onto the back of the bunny (no sewing!) Then I added some more roving and needle felted that on top of the tail to make it a little fluffier.
I had so much fun making these that I might make a few nests with eggs to hang on the little indoor tree that we have, or I might just make a few more to give away :) Sometimes the joy is found in the process of creating or trying something. Sometimes it is in the thing that I've created and in the giving of it.

Tuesday, April 5, 2011

Blowing Out Eggs

My friend down the road comes most days and gleans our eggs. We get soooo many right now that we can't eat them all! She thought that some of our naturally colored eggs would be great to set out for Easter, so she blew some out... the hard way. One hole in each end of the egg and blow until your head feels like it will explode!

I knew that Sheepy and her family had made some Ukranian decorated eggs and that she had a way to blow out the eggs with only one hole and she had a 'machine' that did it for her.

When I asked about it, she told me she used a small fish tank aerator hooked to the hose with a hypodermic needle on the end. She said she had to be careful because until she got the hang of it, she blew up a bunch of eggs. She said I could borrow her 'specialized equipment.' (Farmers have alot of 'specialized equipment like that!)

Hmmmmm..... I decided that I could probably do the same thing here with thy hypodermic needle on the end of a syringe instead of getting a fish tank aerator.

I didn't want to wait until the next time I saw her, I wanted to try it right now.... sometimes I hatch a great idea and nothing else can get through my head until I get it done!

This works best with eggs that are at room temperature and a drill bit that is sharp. A dull bit will crack and break the eggs.
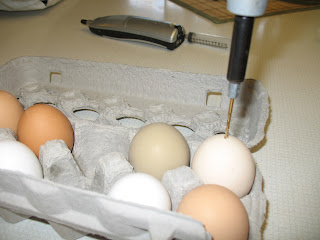
First things first, drill a hole in the end of the egg (or the side if you want the ends to show in your final project). I used a small bit on my drill. If the egg is sitting in the carton it has some support, which worked out well for taking photos with one hand, too. Drill into the egg, then reverse the drill and back the bit out. If you just pull the bit out, you will crack the egg.... guess how I know! A small piece of tape placed in the spot you are going to drill will help support the egg and help prevent the egg from breaking.
I used a 12 cc syringe with a 22 gauge 1" needle on the end. The 12 cc syringe is comfortable to hold and holds enough air to only have to open and close the syringe about 3 times per egg. You can use a larger and longer needle if you have them on hand. You can buy syringes with hypodermic needles at most local farm supply stores.

Sorry the photo is fuzzy.... trying to do this and take photos is really tricky! In this photo I am gently pushing air into the egg through the hole on the bottom with the syringe and needle. The hole is large enough that there is room for the egg yolk and white to squeeze out around the hypodermic needle. Of course, I do it over a container to save the edible part of the egg. 
I remove the needle and syringe from the egg to refill the syringe with air. Usually more egg gloops and slimes through the hole.
Once the inside of the egg is in the bowl, I remove the needle from the syringe and fill the syringe with water. Then I put the needle back on and force the water mixed with a little bleach into the egg. A 20 gauge needle is very small, so the syringe fills with water much faster without the needle on. The needle is so small that you can't shoot the water in very fast, either. Slow and steady is better for cleaning out eggs!

Next I remove the syringe and needle from the egg, place my finger over the hole in the egg, and shake the egg with the water and bleach inside.

Then I turn the egg so that the hole is on the bottom over the sink, and gently fill the egg with air to force the water and bleach out. I repeated this step twice so that the inside of the egg would be fairly clean and wouldn't end up smelling later on.

The photo right above has a piece of tape over the egg. If I wasn't careful with the drill bit, I would crack the egg, a piece of tape over the place I was drilling helped to stabilize the egg so that the hole would be perfectly round and nice looking.

CooleyBug (my neighbor) is away for a few days so I didn't get a photo of her beautiful egg display yet.... I'll add it as soon as she gets home.

Now.... on to the next project!

Update 4/13/11:
I found that if I put a piece of masking tape with a hole in it at the end of the egg, it makes it much easier to keep the egg from breaking. The masking tape molds to the rounded shape of the egg better than any other tape I tried. The hole in the tape helps the drill to stay in the right spot while I'm drilling.
The best way to see the hole in the masking tape was to put the tape on the floor. When I put it on the egg for the photo I couldn't see the hole, which wouldn't help anyone looking at the photo!

Saturday, November 20, 2010

A "Hippy" Snowflake

I had a few minutes the other day and made a 'hippy' snowflake with Sharpie Markers and alcohol. I think it turned out cute! Two friends stopped by yesterday and I showed it to them. They thought it looked like so much fun they are going to try it with their grandkids.

Here is my first post using a milk filter to make a snowflake.

My Hippy Snowflake!
I put the milk filter on a paper plate so that the Sharpie Marker wouldn't get on the counter. If I was going to do this with children, I would use a paper plate lined with a paper towel. The pellon milk filter is made to let liquids pass through, not absorb them, so the rubbing alcohol needs someplace to go. I decorated the milk filter before I cut it out. I suppose you could color it and use the rubbing alcohol on it after you cut it out, but I think the colors blend better when it is done before cutting.

One of the other things I tried was cutting the milk filter with a craft knife as well as scissors. The milk filters are so much nicer to cut than paper that I could cut shapes anywhere I wanted! I didn't have to cut only on an edge, I could lay the snowflake down on my cutting mat and cut shapes out of the middle of the flakes.

You can see in this photo that I not only cut from the edges, I cut shapes out of the center of the side using a craft knife.

I've got friend who is probably in her late 50's who was never taught how to cut snowflakes. Next week I plan on bringing some milk filters and all the other supplies I need over to her home and we'll make a few snowflakes together. I've already told her I'm coming, and she is very excited! Me, too!