Thursday, April 7, 2011

A Nest for Mama Bird

My sister was in our state yesterday. I haven't seen her for two years! Not since my mother's funeral.

I wanted to send a little something home with her for my niece and nephew and I have been itching to be 'creative' again.

I made a little nest last week and gave it to the CooleyBug's youngest daughter. It was so much fun! I've never felted anything on purpose or needle felted anything. I ran across a blog post called, "Edds for Mama robin bird!"

Sheepy gave me some felting needles a few years ago and I hadn't ever used them. I admit I was nervous, and not sure I could really felt with a needle. I have plenty of wool roving around, and some wool yarn that is perfect for felting. Instead of hand knitting the nest and square for the bunny, I did both of those parts on the knitting machine.

All I did was follow the directions.... this is what my second try looks like.  I decided I would get a photo of it before I gave it away, too!

The nest and eggs are just the right size for her 18" doll.

And are some photos of a little bunny I made for my nephew. I found the directions at Jo So and Sew. She has a wonderful tutorial. This is my first bunny and I don't think it turned out as cute as her tutorial, but I am sure I will try it again.

I needle felted his tail (my favorite part of the bunny!) as well as his eyes and nose. I felted the whole bunny, too, by putting him in the washer.

The next time I will do a better job making his little nose more of a triangle. This was my first time needle felting a tiny piece of roving onto a knitted piece of cloth.

The tail is the cutest part! I needle felted a ball, then I needle felted the ball onto the back of the bunny (no sewing!) Then I added some more roving and needle felted that on top of the tail to make it a little fluffier.
I had so much fun making these that I might make a few nests with eggs to hang on the little indoor tree that we have, or I might just make a few more to give away :) Sometimes the joy is found in the process of creating or trying something. Sometimes it is in the thing that I've created and in the giving of it.

Tuesday, April 5, 2011

Blowing Out Eggs

My friend down the road comes most days and gleans our eggs. We get soooo many right now that we can't eat them all! She thought that some of our naturally colored eggs would be great to set out for Easter, so she blew some out... the hard way. One hole in each end of the egg and blow until your head feels like it will explode!

I knew that Sheepy and her family had made some Ukranian decorated eggs and that she had a way to blow out the eggs with only one hole and she had a 'machine' that did it for her.

When I asked about it, she told me she used a small fish tank aerator hooked to the hose with a hypodermic needle on the end. She said she had to be careful because until she got the hang of it, she blew up a bunch of eggs. She said I could borrow her 'specialized equipment.' (Farmers have alot of 'specialized equipment like that!)

Hmmmmm..... I decided that I could probably do the same thing here with thy hypodermic needle on the end of a syringe instead of getting a fish tank aerator.

I didn't want to wait until the next time I saw her, I wanted to try it right now.... sometimes I hatch a great idea and nothing else can get through my head until I get it done!

This works best with eggs that are at room temperature and a drill bit that is sharp. A dull bit will crack and break the eggs.

First things first, drill a hole in the end of the egg (or the side if you want the ends to show in your final project). I used a small bit on my drill. If the egg is sitting in the carton it has some support, which worked out well for taking photos with one hand, too. Drill into the egg, then reverse the drill and back the bit out. If you just pull the bit out, you will crack the egg.... guess how I know! A small piece of tape placed in the spot you are going to drill will help support the egg and help prevent the egg from breaking.
I used a 12 cc syringe with a 22 gauge 1" needle on the end. The 12 cc syringe is comfortable to hold and holds enough air to only have to open and close the syringe about 3 times per egg. You can use a larger and longer needle if you have them on hand. You can buy syringes with hypodermic needles at most local farm supply stores.

Sorry the photo is fuzzy.... trying to do this and take photos is really tricky! In this photo I am gently pushing air into the egg through the hole on the bottom with the syringe and needle. The hole is large enough that there is room for the egg yolk and white to squeeze out around the hypodermic needle. Of course, I do it over a container to save the edible part of the egg. 
I remove the needle and syringe from the egg to refill the syringe with air. Usually more egg gloops and slimes through the hole.
Once the inside of the egg is in the bowl, I remove the needle from the syringe and fill the syringe with water. Then I put the needle back on and force the water mixed with a little bleach into the egg. A 20 gauge needle is very small, so the syringe fills with water much faster without the needle on. The needle is so small that you can't shoot the water in very fast, either. Slow and steady is better for cleaning out eggs!

Next I remove the syringe and needle from the egg, place my finger over the hole in the egg, and shake the egg with the water and bleach inside.

Then I turn the egg so that the hole is on the bottom over the sink, and gently fill the egg with air to force the water and bleach out. I repeated this step twice so that the inside of the egg would be fairly clean and wouldn't end up smelling later on.

The photo right above has a piece of tape over the egg. If I wasn't careful with the drill bit, I would crack the egg, a piece of tape over the place I was drilling helped to stabilize the egg so that the hole would be perfectly round and nice looking.

CooleyBug (my neighbor) is away for a few days so I didn't get a photo of her beautiful egg display yet.... I'll add it as soon as she gets home.

Now.... on to the next project!

Update 4/13/11:
I found that if I put a piece of masking tape with a hole in it at the end of the egg, it makes it much easier to keep the egg from breaking. The masking tape molds to the rounded shape of the egg better than any other tape I tried. The hole in the tape helps the drill to stay in the right spot while I'm drilling.
The best way to see the hole in the masking tape was to put the tape on the floor. When I put it on the egg for the photo I couldn't see the hole, which wouldn't help anyone looking at the photo!

Monday, April 4, 2011

Barnyard Photos

Just some photos from chores this morning. 

Daisy, our Huarizo (half llama, half alpaca) guarding the door way with the sheep inside the stall. She is actually very sweet and gentle and isn't much of a guard animal.

One of the hens cleaning up the leftovers from the goats.

Another hen checking to see if there is anything left in this feeder.

The trees reflected in a puddle on our driveway.

Sunday, April 3, 2011

Queso Fresco

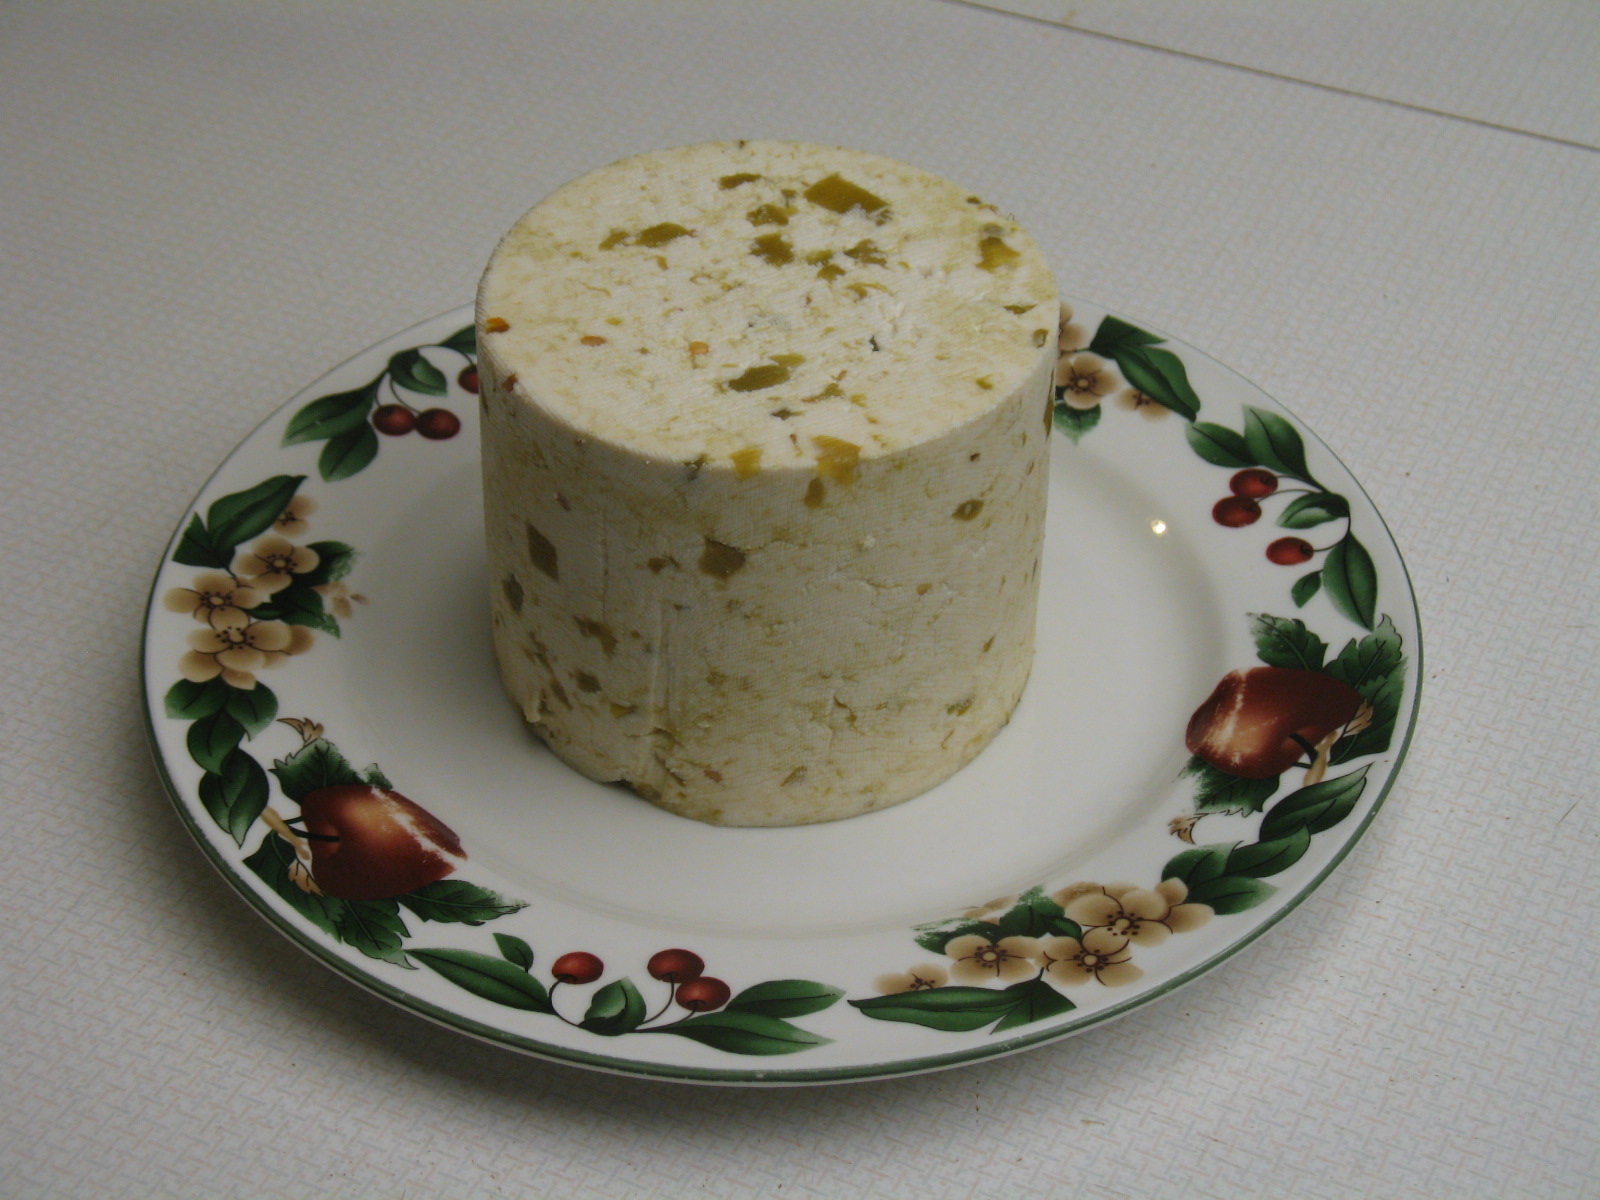
I decided to try making some Queso Fresco because it looked like an easy cheese and I wanted to try out the new press and mold.

It is easy, and delicious!

2 gallons of milk ready to go in the pot. I love our new milk bottles! They are much easier to handle than 1/2 gallon canning jars.
This is the milk straight out of the milk fridge. If we keep our milk in sealed jars and at a low temperature, the raw goat's milk still tastes fresh on day 10!
Heat the milk to 90˚F. No, I didn't pasteurize it. I used raw milk and just heated it up.
I added 4 cubes of mesophilic starter that I had prepared and frozen from a mother culture. You can also add 1 packet of direct set starter if you don't have prepared starter. I haven't tried it with buttermilk or yogurt, but that might work, too. I'll save that experiment for when we are getting 5 gallons of milk a day.

Mix in the starter well (or stir gently until the frozen starter is melted.) I had to turn the heat on very low after adding the frozen starter to keep the temp around 90˚F.

Next add 1/4 teaspoon of liquid rennet that has been diluted in 1/4 cup of filtered, unchlorinated water. Stir gently with an up and down motion for about 1 minute until the rennet is completely mixed into the milk and starter.

Now go clean a bathroom (or whatever takes 30-45 minutes) until the milk sets up and you get a clean break. I let mine sit for an hour because I got distracted. It was fine!

Cut the curd into 1/4" pieces. I try really hard to get my curd that small, but it isn't a consistent size no matter what I do. I do the best I can and while I am stirring the curd, I break any that look too big into smaller chunks.

Stir the curd gently for 20 minutes slowly raising the temperature of the curds to 95˚F. This is the hardest part on an electric stove. Use the lowest setting and if there isn't a change in the temperature within 3 minutes, turn the heat up slightly. The reason you heat slowly is to release the whey from the curds, but it has to be slowly or the curd forms a 'rind' on the outside and doesn't let the whey out.
Turn off the heat and let the curds sit for 5 minutes.

Drain off the whey. I put the bowl on the floor (and sometimes a towel under the bowl) because it is easier to strain the whey off. I'm not quite tall enough to do this as gracefully in the sink. I use a spatter shield on the front of the pot to hold the curds in and let the whey out.
 The whey doesn't all come out on the first pouring. I have to sit the pot on the floor and stir the curds gently and repeat the pouring/stirring process a few times until the whey is drained. Sometimes I will pour the whey off, then sit a strainer in the top of a pot and gently pour the curds into the strainer. Then I can let the curds sit there for a bit while they drain.

Pour the curds back into the pot if you used a strainer and add about 2 Tablespoons of cheese salt (salt with no iodine). Let the curds and salt sit there at 95˚F for 30 minutes. I put my curds in my oven with the light on. You could also use a Wonderbox, or wrap the pot in towels to keep it warm.

After 30 minutes gently mix in anything you think would be tasty. Our first batch had 2 cans of diced green chilies in it. Our next batch was mixed with basil, garlic, and onion. I think it would have tasted wonderful in some lasagna or crumbled on top of spaghetti--but it didn't last that long.

Next line a mold with cheesecloth and fill it with the curds. This was the first time I used cheese cloth instead of buttermuslin to line the mold. The cheese cloth works much better! It is a lighter weight weave than the buttermuslin and is much easier to handle when putting the cheese into the mold. The follower fits in better, too, because there is less bulk.

Press at 35 pounds of pressure for 6 hours. I let our second batch go for 10 hours because I wasn't really paying attention when I started the cheese and what time I put it into the mold. It turned out fine.

This is the first cheese we made in the new press with the new mold and the new drain. I LOVE them! It makes the process so much nicer than my old game board press!

Remove the cheese from the mold and taste it! Yummy!

I wrapped some up for a few good friends to try. They all loved it! One said I should add pimentos, too. I told him I would show him how to make the cheese and he could add anything he liked!
You can store this fresh, pressed cheese in the fridge for up to 2 weeks, at least that is what we read. Ours never lasts that long!

Friday, April 1, 2011

Home Remedies for Stopping Bleeding

Sheepy called me and wanted to know if there were any household remedies for stopping bleeding. I remembered that you could use cornstarch or spider webs (which are rich in vitamin K), but I didn't know of any others. She is planning on taking off a bit of her buck's scur and wants to make sure that if there is more bleeding than she is comfortable with, she has something she can try.

I'm not recommending any of the ideas below.... I haven't tried any of them except the blood stop powder that I bought at the farm supply store. But I wanted the information handy just in case I want to try something else. And that's why I put things like this on my blog.... just so I know where I can find them. It's kinda like an electronic brain for me!

I did a quick internet search and found a few things that would stop minor bleeding. I think that pressure, bandages, and a trip to the emergency room (or veterinarian) would be best for a bad wound. But sometimes if it isn't a bad wound, then it is nice to try something at home.

Here's the link I found the most helpful information:

Bleeding Home Remedy

Some things on the list that I didn't know about, but make perfect sense, were wet tea bags (not herbal--just regular tea), yarrow, duct tape, salt mixed with water, dry coffee grounds, and cayenne pepper.

Hoosier Home Remedies by Varro E. Tyler recommends scrapings of sole leather applied to a cut and the juice from a milkweed plant that is dripped into the cut or wound. Also, chewing up sassafras leaves (sassafras albidum) until they are fine and then applying the mass to the would should stop bleeding.

Tea leaves and leather scrappings both contain tannins and will act as styptics.

We'll stick with the blood-stop powder stored out in the barn, but I love knowing other ways of doing things!

Thursday, March 31, 2011

New Kids!

Rosie finally 'popped'! Yay! She was huge and we thought if she didn't have kids soon she was going to burst. This is Rosie's first kidding and all went well. In fact, it went so well that we missed it.

By the time Vet2Be went to do chores this morning he found two wet doelings already up and nursing. Rosie had already passed the placenta, too! (Yay for the right amount of copper/cobalt in their diet's now!)

We brought out some towels and the blow dryer to finish drying them off, and then put on their little sweaters.

Probably toooooo many photos, but we are so excited with the first batch of kids!

Hello!

It's so nice to be here!

Lilly looks like she is smiling! She is wrapped up in an old towel waiting for her turn with the blow dryer. Lilly is the quiet one (so far).

Rosie, the mama. She is a S'nubian, Nubian mama and Saanen papa. She should give ALOT of milk this year!

Lilly waiting for her turn for the blow dryer. She loved being all snuggled up and warm in the towel. She almost went to sleep!

Rosie, the mama. She was born last spring and came out loving people!

Poppy is first with the blow dryer. She loved feeling the warm air all over her. The noise didn't bother her one bit! Poppy is the noisy one!


Lilly's turn! Ahhhhhh..... I think I could just sleep right here all day!

Poppy in her purple sweater.

Lilly in her red sweater.
All three are tucked into a stall by themselves for the day. The weather is nice, but we like to keep them all together for a day or two before we let them all out with the herd.

Three more goats to kid! Annie should be kidding out in the next week or so, and Janice (we call her the Grandma goat because she is the oldest and takes good care of all the babies!) should kid out within a month. Clover, the Nubian, will kid out in June. She mis-carried and then decided that she wanted to be bred again, so we consented and she was bred to the Saanen buck again.

Wednesday, March 30, 2011

Vegetable Bouillon~Part 2

I decided that I would try drying the bouillon because I was sure I wouldn't be able to use it quickly enough if I left it in the fridge.

Here is a link to my original post on Vegetable Bouillon.

I sprayed the silicone mat with olive oil so that the mushy stuff wouldn't stick when I tried to take it off.

Here is the green goop spread on the silicone mat in the dryer.


I wasn't sure there would be enough airflow around the vegetable bouillon, so I put another tray on top of the mat.
I started the dehydrator and had the temperature set on the lowest setting. I didn't really want to cook the vegetables. But after about 12 hours there was no change... it was still mushy, not even the surface was dry.

So I turned up the heat to the highest setting. It still took another 36 hours for it to completely dry. Maybe next time I will spread it thinner and start with high heat.

Here it is broken and put in the blender before I powder it.


All powdered! About 3 cups of wet vegetable bouillon fits into an old yeast jar, which holds about 1/2 cup (I think).
It smells really good! And I like that I don't have to store it in the refrigerator or the freezer. It tasted great in the meat pie last week (before dehydrating), now I'm tempted to try sprinkling it on some chicken before Hubby grills it.

Got some suggestions on how to use it? I'd love to hear them. I made the bouillon because I thought it looked like a neat thing to do, not because I know what to do with it now that I've got it. Weird, I know, but it keeps life interesting!