I use the recipe in Home Cheesemaking by Ricki Carroll as my basic recipe, but I changed the starter from a mesophilic starter to yogurt. The reason I use yogurt is because it works as well as the plain mesophilic starter and has a little different flavor. I read about using yogurt in an old Solait Cheesemaking booklet.
Feta takes me about 7 hours to make. Most of that time I am not doing anything with the milk or curd itself, it is sitting and waiting for the next step as I follow the recipe. I start this cheese in the mid-morning and it is ready to put in the fridge by dinner or after we are done milking.
Feta
Step 1 (From Home Cheesemaking--with modifications)
Heating the milk and adding the starter
I usually make a two gallon batch since I have so much milk. In the photo below I've heated two gallons of milk to 86˚F.
 |
| Two gallons of fresh goat's milk. I didn't pasteurize it this time. After making clabbered milk I realized that raw milk isn't as scary as I once thought. |
 |
| 86˚F, just the right temperature to add the starter. |
Then the milk is covered and left at room temperature for an hour to ripen. I put it on the back of my stove in a draft free spot. In the winter I put it into my wonderbox, but in the summer I leave it on the stove.
 |
| Ripening for an hour on the back of the stove. Sometimes it ripens for a little longer if I am off doing something else. |
Step 2
Adding the rennet.
 |
| 1 teaspoon of liquid rennet added to 1/3 cup of unchlorinated water. |
Step 3
Cutting the Curds
After cutting the curd, I let it rest for 10 minutes. Apparently cutting the curd is hard work for the cheese.
Step 4
Stirring the curd
(look here for updated recipe changes)
Step 5
Draining the curd
 |
| Pour the curds and whey from the pot into a wire mesh strainer lined with butter muslin. My mesh strainer fits exactly into the top of my spaghetti pot, that I only use for cheesemaking! |
Step 6
Crumbling the curds
 |
| Right after I open the bag! |
 |
| Ahhh... the beauty of a nicely drained curd! It is so smooth and creamy looking, I love it! This is one of the reasons I fell in love with cheesemaking, the curd as it comes out of the bag. |
Step 6a
Quick aging the cheese
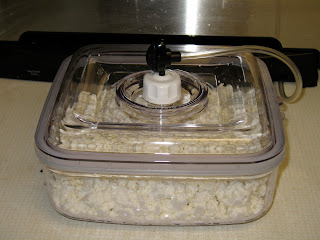
Since I have a FoodSaver with a marinating container, I thought I would see if I could quick age the cheese this time. I put the curds into the container and hooked it up to the FoodSaver. If I was being scientific (in other words, I should have.....) I would have put half of the salted curds in a covered bowl in the refrigerator and half the curds into the marinating container. We're still milking, so I'm sure I'll give that a try the next time!
 |
| All ready to go into the fridge. Masking tape makes a great label in my fridge. I always know what is in the container and what the recommended 'ready' date is. |
Of course I tasted it before I put it in the fridge. Most of it was gone before the 'ready' date, too! It was delicious!


That is almost the same instructions as the Chevre cheese I make. The longer you strain it the more crumbly and the less the more creamy...
ReplyDeleteSo do you know what the difference is between Chevre and Feta? Because I have had goat's milk Feta too and it doesnt taste like Chevre..
Good Post!
When I'm making Chevre I use a different starter. Either the New England Cheesemaking Chevre starter or buttermilk.
ReplyDeleteWhen I'm making chevre I don't stir the curd, I pour it directly into the cheesecloth and let it drain.
I use half the amount of rennet in chevre than I do in feta, too.
Although the steps are almost the same, the amount of rennet and stirring the curd makes the cheese different. Stirring the curd releases more whey, so that would also make the feta drier.
Also, feta has salt added to it or it is brined, but the chevre doesn't have salt added to it unless you are flavoring the cheese.
I'm really not a cheesemaking expert, but my best guess is that feta is a drier cheese and able to crumble better because of the stirring and the extra rennet.
Yum! Looks as easy as Ricotta
ReplyDeleteHi--I recently became interested in cheesemaking, & also found my old Solait Yogurt Maker w/o instructions. I googled & found the brochure you scanned in, then found a reference to your blog on New England Cheesemaking help blog. I wondered if you might have omitted a page, page 2 of the Feta recipe? If so, can you add it or email me? I was saving the brochure for future use, don't know enough to figure out the missing steps. Enjoyed reading.
ReplyDeleteSorry! I must have missed scanning that page in! I'm not sure if I can fix the original on Scribd, I'll do my best. If I can't, then I'll upload the whole booklet again.
ReplyDeleteNice fill someone in on and this enter helped me alot in my college assignement. Thanks you as your information.
ReplyDelete