Thursday, April 28, 2011

New Fencing

Things have been busy here. We are getting new fencing! Yay!

The old vinyl fencing was in horrible shape. The previous owners were told that it was 'animal grade' fencing. It wasn't. But it took us a long time (15 years) before we were able to replace it.

This fencing, although not beautiful, will last for 50 years and be able to withstand horses and bucks!
New fencing! Drill pipe with wire panels welded on to them.

The pipes were sunk 3 feet into the ground. No animal is going to be able to move them! Okay, maybe an elephant, but we don't raise elephants.

We have some great guys working on it since no one in our family can weld. I can't tell you how excited I am to have gates on hinges instead of gates on bailing twine! Hoooray!!!


They have been working on the fence for about 2 weeks, hopefully it will be done by the middle of next week. Then we can put all the animals back where they belong. For now, I'm really glad we have the kind of animals we have. They are easy to move around and put together with each other.

The neighbor has to bring her horse down the road to another pasture every day and then bring him back every night. No fun at all!

Hooray for new fencing!!

Thursday, April 21, 2011

Starting Another Garden

I'm not much of a gardener. I'd rather be playing guitar. But... we give it a try every year in hopes that one day.... we will have more from our garden than we can eat in one evening meal.

So we're trying again.

Hubby bought a little greenhouse from Costco this year in hopes that we can actually grow some good vegies.


Seriously... some years even the zucchini don't make it.

Inside the greenhouse are some plants that I traded with a friend for some books I wasn't going to use.
The ones in the little grow box are some that I planted. Chances of them germinating? We'll see. It hasn't been very warm in the greenhouse. We currently have a lamp with a 60 watt bulb in it to help on the nights that it gets down to freezing.
Here are the hopes and dreams for the coming summer.  They are in the peoplehouse instead of the greenhouse because most of their packets said they had to germinate at 80˚F, which doesn't really happen in the house. But the greenhouse hasn't gotten that warm since we put it up last Saturday.

I make some nice plant headstones, though! Okay... they are supposed to be plant markers.
Vet2Be has a green thumb. Any year he has helped we have been able to get a few dinners out of the garden.

You would think that with 15 years of manure and straw mulched into the garden we would all have green thumbs! Nope, I still have a brown thumb.

Last fall Vet2Be's little fruit tree was blown over in the wind. Hubby thought there was no way it would make it. Vet2Be tied it to some rocks and we let it stay through the winter.

Good ole' baling twine and a few big rocks.
Wouldn't you know.... it was the first tree to bloom this year! That's because I didn't touch it.
So... guess who is going to get to do most of the weeding this year :) Not me! Okay, okay... I'll help.

Tuesday, April 19, 2011

Homemade Needle Felting Tools

I've been playing around with needle felting a little bit. It's been fun making little eggs. Holding the needles is a bit wearing on my hands, though. They are so thin!

I decided to make a few handles with things I had around the house. It took me a while to come up with something that I liked.

I had 4 separate needles and wanted to make a handle with a single needle, and a handle with 3 needles. One needle is great for doing little details, three needles are great for larger areas.

Because I can be a little clutzy from time to time, I taped the protective covers on the needles while I was working.
The first handle is two craft sticks with some J-B Stik, which is an epoxy putty. I've used it for all sorts of things. I mushed up a piece, rolled it into a little 'snake' and put it on one craft stick. Then I placed the needle in the middle. I left the little hook-handle on the needle because I thought the putty would hold it tighter and longer. You can see the little hook end in the first photo.

Same handle as above, but I took the protective cover off the needle. After the putty hardened, I wrapped the outside of the handle with some athletic tape. Duct tape would have worked, too. It makes the handle smoother and more comfortable to hold.
This is my finished second handle. It holds three needles. I used an old foam paint brush handle and drilled three holes in the top. It was really tricky to get the holes to go in straight!

I cut off the hook ends of the needle so they would slide into the holes. Yes, I left the protective covers on the needles while I was working! Next I put some wood glue in the holes and pushed the needles gently into the holes. I made sure that the needles were even at the tips.

Bad photo, sorry. Point and shoots are sometimes hard to focus. After I got the needles into the holes and even, I mixed up a little more putty and put it around the tip of the handle and between the needles for a little more stability and security.
My first project with my new homemade tools!
KnitPicks has a video on how to make this little lamb. It is soooo cute and easy to make. It was my first project after making the new handles.

Here's the link so you can make your own needle felted lamb:
Make Your Own Needle Felted Sheep

Vet2Be decided that needle felting looked fun. After all, it involves wool AND sharp, pointy tools! Just like a boy..... gotta be creative..... but it's gotta be a little dangerous!

Monday, April 18, 2011

New Door

When Hubby asked me what I wanted for Christmas, I said, "A new front door!" The old one was kinda ugly, and it wasn't closing very well.

We looked and decided to wait and save our money for just a little longer.

A few weeks ago we found a great door at Lowe's. It fit the opening for our door, and they could install it! Yay!

The week before they came to install it, the old door really gave up. It wouldn't stay shut unless we used the dead bolt. Too many years under it's thresh hold and too many new door knobs had really taken its toll!

Old door. Vet2Be said he will miss the old door. He really liked it.

New door! We still need to paint the trim, but it's been a bit too cold.
I love that the door lets in lots and lots more light! I love that it latches when we shut it! And I love having something that looks cleaner and brighter on the front of the house.

Sunday, April 17, 2011

Bees Are About!

Vet2Be and Hubby have been out with the bees a few times this spring. Yay! The bees made it through the winter!

Last week when they went out they added another box to the top. When they removed the top of the hive they found it filled with burr comb already. And the burr comb had larva in it. They saw all stages of larva!

I thought about sending the camera out with them, but didn't. Vet2Be thought about bringing the camera out with him, but didn't. So we don't have photos of the larva and the burr comb--but Hubby and Vet2Be were very excited!

Recently they went out just to look. Hubby likes to spend a few minutes looking at the bees right before dinner. I think it calms his nerves a little, seeing all the workers working and feeling the nice warm weather, too.

You can really see all the bees using the second entrance towards the top of the hive.

They like the bottom entrance, too, but it is harder to see them in this photo.

It seems that we will have plenty of honey this year! Hooray! Last year we didn't take any honey from them because we weren't sure if they would make it through the winter if we did. Last spring was horrible! Most people around here planted their gardens 3 times because it would just begin to warm up, and then we would get a frost.

Not much fruit out here last year, either. And with all the construction close to our home, there were lots and lots of trees cut down. We all think the reason the bees struggled last summer was the weather killing so much of the fruit trees, flower gardens, vegetable gardens, and the loss of the trees. Hopefully we'll have a better year this year!

Saturday, April 16, 2011

Dyeing Eggs with Silk Ties

I've seen this process a few times around on the internet. Skip To My Lou has a great tutorial with beautiful photos.

While I was looking for ties at the thrift store ($2 each) there was another mom with her daughter looking at ties, too. Her daughter was about 5 years old and kept asking, "This one feels nice. Is this the right fabric?" I asked the mom, "Are you going to dye eggs with silk ties, too?" "Yes." I always think it's great when I meet up with other people who are trying crazy things like me!

I invited my friend, CooleyBug, over to experiment with me. I thought that would be a great idea since she is the one that kinda got the 'blowing out eggs' thing started. We had a really nice time!

Here's the process we used and the things we figured out as we went along and looked back at what we had done. If you want to see how we blow out eggs, you can see how we do it here.

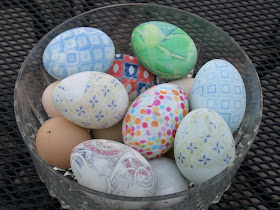
We started with blown out duck eggs. There are some blown out chicken eggs in the bowl, too, but we wanted to use duck eggs since they are much sturdier.
Old silk ties (they must be 100% silk or the dye won't transfer). We took them apart at the seams and only used the silk parts (I tucked the interfacing away in my box just in case I need tie interfacing sometime in the future).
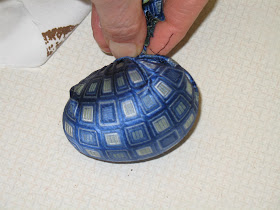
We found that if we wet the silk before wrapping it around the egg, the silk was much easier to handle. This piece of silk was from the lining of one of the ties!
Sometimes the tie fabric was fairly thick and had to be folded and twisted on one side.

Sometimes the fabric was nice and thin and we could roll the egg in the fabric and twist the ends like a little candy.
Then we tied up the silk wrapped egg in an old rag. We decided later that we would have had better results if the rags had been cut on the bias so they would wrap around the egg more snugly.
We filled the pot with water and added 1/4 cup of white vinegar. Since the eggs were blown (hollow) we knew they wouldn't stay under the water. I added the cake cooling rack which happens to fit inside my pot.
Here's where it gets a bit wacky.... the cooling rack wasn't heavy enough so we added the colander upside down over the top.....
Then rested a pot on top of that. It worked.  I realized later that I could have used the flat weights I use for the cheese press on top of the cooling rack, too. We simmered the eggs for 30 minutes.
I put the eggs into a basket and let them drain and cool in the sink. Remember, these eggs were hollow so they filled with hot water while we were simmering them.
We unwrapped the rags and this is what we saw.
After taking off the silk ties, this is what the eggs look like. You can see the silk wrapping under the eggs.
I found one tie with Micky Mouse on it! It turned out really cute! CooleyBug took that one home because I thought her kids would really appreciate it.
One of my favorites. This was the lining of one of the ties. After we unwrapped them we had to use the same process we used for cleaning out the eggs--basically pushing air into the egg through the hole in the bottom to gently force the water out.
This is my half of the eggs put back in the bowl.
One of the things we tried was using both sides of one of the ties. You can see the two eggs with diamond shapes on them in the bowl. The darker one was the inside of the tie, the lighter one was the outside of the tie.

We learned that the tie has to be touching the egg or the dye doesn't transfer. Next time we will be sure to use rags cut on the bias. You can see a few eggs that don't have a complete transfer. 


It was really fun working with CooleyBug! She has two young daughters that came and played while we played. CooleyBug told her daughters that moms need play-dates, too! Sounds like a great idea to me!

Friday, April 15, 2011

A Simple Repair

I've seen this done somewhere... but I can't remember if it was in some old farming book or magazine or somewhere on the internet.

The caddy I use for my machine knitting tools was slowly loosing it's sides. It wasn't meant to hold alot of weight, it was meant to hold silverware and napkins, but I love the color and the little spots that are just right for my tools. I love the handle so I can carry it from one machine to another.

And I like to make things last as long as possible, too!

I filled the side pieces with wood glue, then wrapped a piece of cloth around the whole caddy, and tied a knot. Then I slipped a piece of wood into the knot and twisted it until it wouldn't twist anymore. I like to use a square-ish piece of wood. A pencil works, too, but the bigger piece gives me more to grip.

A long rag about 2" wide, my 'wooden iron', and another narrow rag.
The piece of wood is slipped through the knot and then twisted until I can't twist anymore. Then I tie the wood in place with another rag.
A view from the front. It is best to put the second rag under the first one before you start twisting so it is ready when you need it.
A few hours later the glue is dry and I can take off my simple band. You can see the wood looks secure on the left and the right side of the caddy.
All the tools back inside!
Time to get the next knitting project started!

Thursday, April 14, 2011

Blown Egg Display

Here is CooleyBug's egg display.

It is so pretty sitting on top of her piano! These are eggs that she gleaned from our chickens. We love opening a box of eggs and having all different colors!
CooleyBug is the one who got me started blowing eggs. Here's the easy way to blow out (and not blow up) eggs, Blowing Out Eggs.

Wednesday, April 13, 2011

New Knitting Machine Weights

I found a link somewhere that I've lost that showed some weights for knitting machines made out of forks!

What a great idea! I love the fact that there are no hinges on them! I make socks and mittens on the knitting machine and often have to put a weight on the back of the knitting. It's pretty tricky when the weight has a hinge on it.

These do the trick! And since I already had a few old forks laying around, all I needed was a few rolls of pennies and some tape. Hubby bent the forks (they were a bit harder to bend in the shop than when they go in the dishwasher--go figure!) I used some cloth athletic tape because we have quite a few rolls of that (and I couldn't find where Hubby left the duct tape, either). I also taped both ends of the pennies before I taped the roll to the fork.


Another style I saw bend the tines of the forks towards the back of the handle. I'm not sure if that would make any difference or not. I like having the pennies where they are (under the bent part of the tines) because I think the weight is more centered.

To buy new weights would cost over $5.00 each. These cost me 50 cents and a few old forks :) They weigh in at about 4.5 ounces--just right for what I need!

Monday, April 11, 2011

New Curtains for Blondie

Daughter Blondie and her husband moved into a new place last month. They were so glad to be on their own again!

He is a disabled Veteran who will be going to school. Blondie is a elementary school teacher with no job right now, except substitute teaching.

That makes things a bit tight.

They don't want to eat through all their savings so they are doing the best they can with what they have and are trying to cut back on extras.

Their new place has no curtains on the sliding glass door and sidelights in the kitchen. So they can see right into their neighbor's kitchen window, and the neighbor can see into their window.

I gave Blondie two old curtains I had for the sliding glass door, and I looked around for some sheets to make curtains for the sidelights. I found an old sheet on freecycle that was in good shape. I love using sheets for big projects like this. There is soooo much yardage and fewer seams to sew!

One full-sized sheet made two sidelight curtains.
I haven't made curtains in a long time, so I was pleasantly surprised at how much I remembered. Things like always sew the side hems first, then sew the heading, and then measure from the top of the heading where the hem should end and THEN fold up the hem.

Blondie hasn't hung curtains in a long time either, so I made sure to label where the rod goes. Sometimes these simple curtains can be confusing and I've seen them hung from the hem instead of the heading!

Think that is clear enough? Hopefully Blondie will think so!
 Update 4/15/11
Blondie sent me a photo of the curtain hanging in her window. She has it tucked up to the top of the window. If it was just a little lower, then it would reach right down to the bottom.
Not too bad for an old sheet!

Friday, April 8, 2011

Bunny Progress... Good News!

Two photos of the bunny recently. Vet2Be has been diligent about applying the silver nano particles that Hubby has been making and doing research on. Darcy gets it squirted on once a day.

This was taken April 3, 2011.

This was taken April 7, 2011. The 'bunny hospital' is the downstairs bathroom shower.

Here are two earlier photos so you can see the progress.

March 20, 2011. We found the abscess and Vet2Be cleaned it out. We knew the skin above the abscess was dead (it was hard), but knew we weren't equipped to perform that type of surgery. So we cleaned out the infection and waited for Mother Nature.

March 28, 2011. The dead skin from the abscess came off one side. Vet2Be took the entire dead part off.
The first two posts about the bunny can be found here (Not For Weak Stomachs!) and here (Bunny Update).